After completing the rooting process, adding a custom ROM to your smartphone becomes very easy. People have to struggle a lot to get this solution. But you don’t have to worry about those things, as we will cover a step-by-step guide in this article on how to install TWRP recovery on any Android device.
Usually, people are unaware of the whole process of TWRP recovery and are in a hurry to root their phones, which can lead to problems later. Therefore, if you do not know about recovery, it is better for you to flash custom-made recovery on your smartphone to unlock root privileges (superuser).
What is TWRP Recovery?
TWRP (Team Win Recovery Project) stands as a versatile and influential custom recovery software catering to the needs of Android aficionados and developers. With its touch-based interface, TWRP offers a plethora of advanced functionalities that go beyond the limitations of the stock recovery provided by device manufacturers.
The ability to create comprehensive system backups, flash custom ROMs to unlock new features and performance improvements, and install custom kernels and mods for enhanced control over the device’s hardware are just some of the key features that set TWRP apart. However, it is essential for users to tread carefully, as the improper use of TWRP can lead to potential risks and void warranties.
With thorough research and a solid understanding of the process, TWRP can serve as a powerful tool to transform and personalize the Android experience.
How to Install TWRP on any Android Device?
First, you unlock the bootloader of your Android device, then proceed further.
Warning: Failure to follow the following instructions properly could result in serious damage to your device. If your device may void your device’s warranty, proceed with the following steps at your own risk.
Pre-requirements
- Take a backup of your all-important data from your device.
- Unlock the bootloader on your Android device.
- You need a laptop or PC to run commands.
- Make sure your device is charged more than 85%.
- Enable USB debugging & OEM unlock on your Android device.
Find and get the TWRP image file for your device. Below are two methods; you can use any of the two methods.
Method #1: From the Original Source
You can get the TWRP image file for your Android device from the official TWRP website. If you don’t find this TWRP image file for your device, then you are advised to use another method.
Method #2: Look For the Unofficial version
In most cases, if you don’t get TWRP image files after developers launch custom recovery for a limited number of smartphone brands, So in that case it might be a good idea to search for the unofficial version.
Visit the XDA forum and search for your “device model name” & search for TWRP.
Install TWRP on Any Android Device with a PC
- First of all, turn off the device and boot it in fastboot mode.
- Install the suitable Platform Tools and ADB Drivers on your PC or Laptop.
- Download the latest version of the TWRP Recovery file for your device.
- While in Fastboot mode, connect your device to a PC or laptop via a USB cable.
- Now extract the platform tool file and open and type “cmd” in the search section to open the command prompt.
- To check that your device is linked properly, type the command “fastboot devices”.
- Type the next command “fastboot flash recovery” space, and copy the TWRP file text and paste it or you can also drag and drop it.
- Press Enter to start the patching process on your smartphone.
- Now, restart your device and boot it into custom recovery mode.
Install TWRP on any Android Device without PC
If you want to flash custom recovery on your phone without a PC then this method is for you. You can download and install the Bugjaeger Mobile ADB app on your device. With the help of this, you can run a fastboot command on your smartphone.
All you need to complete the process is a USB Type-C connector, a charging cable, and a smartphone with the TWRP file already downloaded on it.
- Boot your device in fastboot mode. And connect to your secondary device with the help of a USB cable and Connector.
- Open the Bugjeager Mobile ADB app on your secondary smartphone.
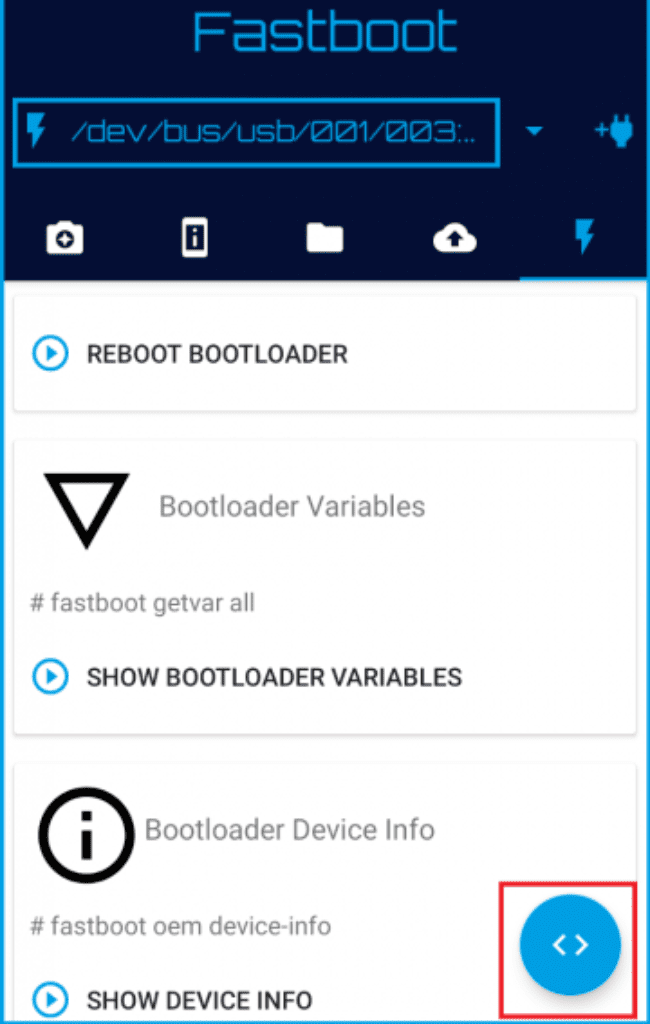
- First, click on the flash icon then click the blue button shown in the image below.
- Type the command “fastboot devices” and press the continue button.
- Now type the command “fastboot flash recovery” space and click on the attachment button.
- Next, find the TWRP file location, and Tap on OK.
- Press the Play button to start the flashing process for the custom recovery.
- Now disconnect your primary device to the USB cable and long-press the Volume Up + Power keys together.
- This is how you can access the TWRP recovery of your smartphone.
Frequently Asked Questions (FAQs)
Ans. A boot loop refers to a persistent problem in electronic devices, such as smartphones or computers, where the system gets trapped in an endless cycle of restarting without successfully completing the boot-up process.
Ans. Follow proper rooting guides and instructions specific to your device model, Backup your data before attempting any modifications or rooting. Avoid installing incompatible or uncertified software that could potentially cause system conflicts.
Ans. Flashing TWRP itself does not erase data, but unlocking the bootloader during the process may wipe the device’s data. It is essential to back up your data before attempting to flash TWRP or make any significant changes to your device.
Conclusion
Depending on how motivated you are and how creative you want to make your Android device, I hope you can download and install TWRP recovery on any Android device without delay after carefully reading the provided instructions. Your Android device’s system settings can be changed with its assistance.