Hello friends, If you are here to root Google Pixel 7, then you have come to the right place. Rooting gives you full access to your device, allowing you to perform many customizations. And today in this article, we will tell you how you can root your device without any problems. All you have to do is follow our given methods step by step.
What is Root?
Deep changes to the system files and settings of an Android device can be made by rooting the device. As a result, a user has more freedom to customize and add additional programs to their device.
This means that an Android smartphone that has been rooted can carry out more customized and authorized operations than a device that has not been rooted, but doing so also puts the device’s stability and security in danger, so it should be handled carefully.
Advantages or Benefits of rooting
- Backup and Restore: Rooting allows you to create a backup of your device’s data and restore the data very easily, which helps protect the user’s data.
- Speed and performance improvements: You can improve your device’s performance, such as by increasing the CPU clock speed or closing unwanted processes.
- User Customization: You can customize your device to your liking, such as by changing themes, icon packs, and fonts.
- More applications: Rooting allows you to install more applications on your device, which can be customized according to your needs.
- Extending the lifespan of your device: Rooting lets you use your old devices in unique ways and extend their lifespan.
Disadvantages or Cons of Rooting
- Losing Warranty: When you root your device, it can void your warranty, as most manufacturer warranties are only valid on an unrooted device.
- Security Threat: A rooted device is more vulnerable to security threats, as it can easily allow an unsuspecting intruder to tamper with the device.
- Software issues: Rooting can cause problems with the pad and phone’s software, which can be difficult to resolve.
- Not keeping up to date: When you root your devices, it can make it difficult to keep them up to date, as you have to carefully install every new software update.
- Data Loss: During rooting, if something goes wrong, your device’s data may be at risk. So before rooting, make a complete backup of your important data.
Pre Requirements:
- Data Backup: Before rooting, make sure to backup your important data because root can corrupt your device’s data.
- Battery charge: The battery in your device should be more than 80%. Otherwise, your device’s battery may drain completely.
- Device version check: Before rooting, check the model number and version of your device because you will need to know the correct rooting method and download some files for your device.
- Internet access: You will need internet access to download the unlocking tool and other things.
- Correct USB Drivers and Cable: Install the correct USB drivers for your device on your PC and choose an original USB cable. This will help you connect your phone to the PC properly.
Let’s Root Google Pixel 7
We investigated several alternative methods for root Google Pixel 7. We think that the two methods for rooting your device that are shown here are secure and easy to use. Rooting your device involves both Method #1 (rooting your device without a PC) and Method #2 (using the TWRP Custom Recovery). Make sure you meet all the requirements to successfully root your smartphone before you begin, though.
Warning:- Please note that rooting may void your device’s warranty and make your device vulnerable, so do it at your own risk.
Method #1: Root Google Pixel 7 Without PC
- Download and install the KingoRoot app on your Google Pixel 7.
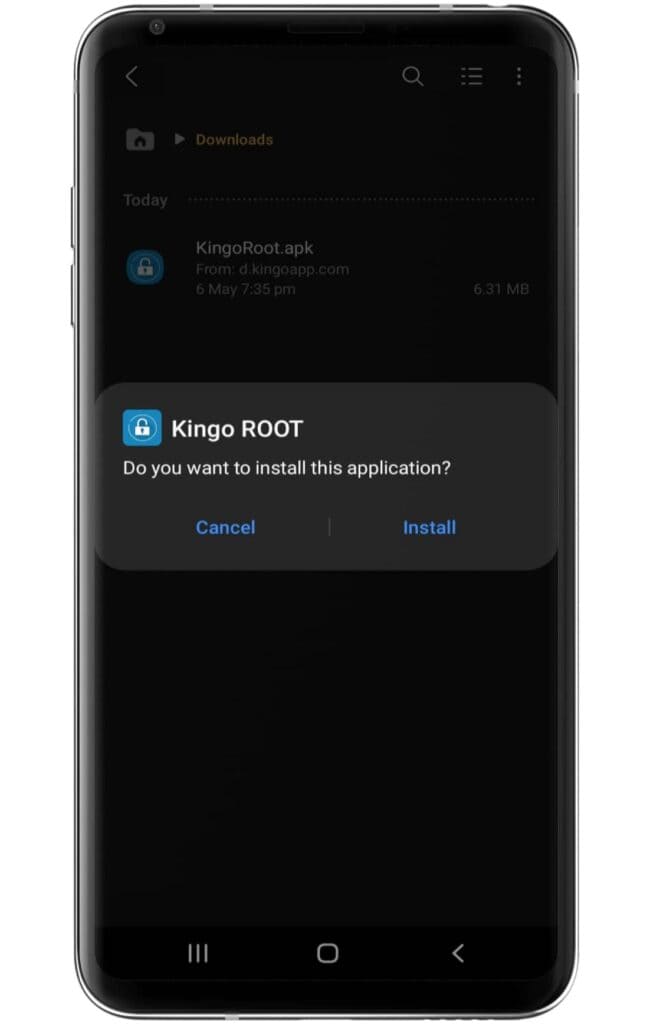
- Make sure to enable the “unknown source” settings on your device.
- Now, open the application and click on the One Click Root option.
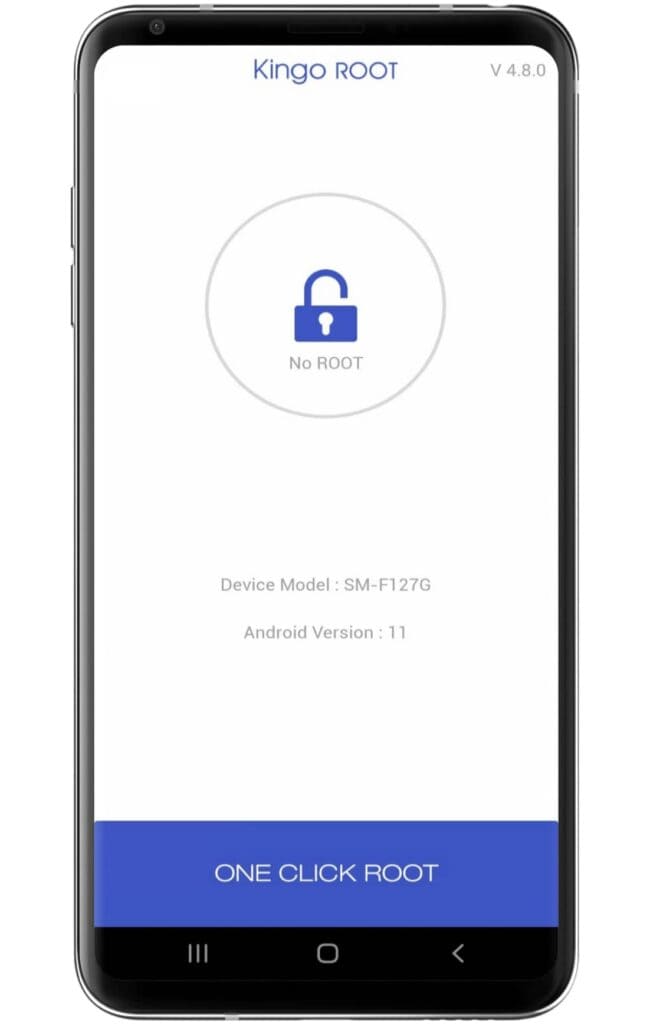
- Wait until the Rooting process ends on the Kingoroot app.
- After completing the process, your Google Pixel 7 has been successfully rooted.
Method #2: Using the TWRP Custom Recovery
Step 1: Unlock the bootloader
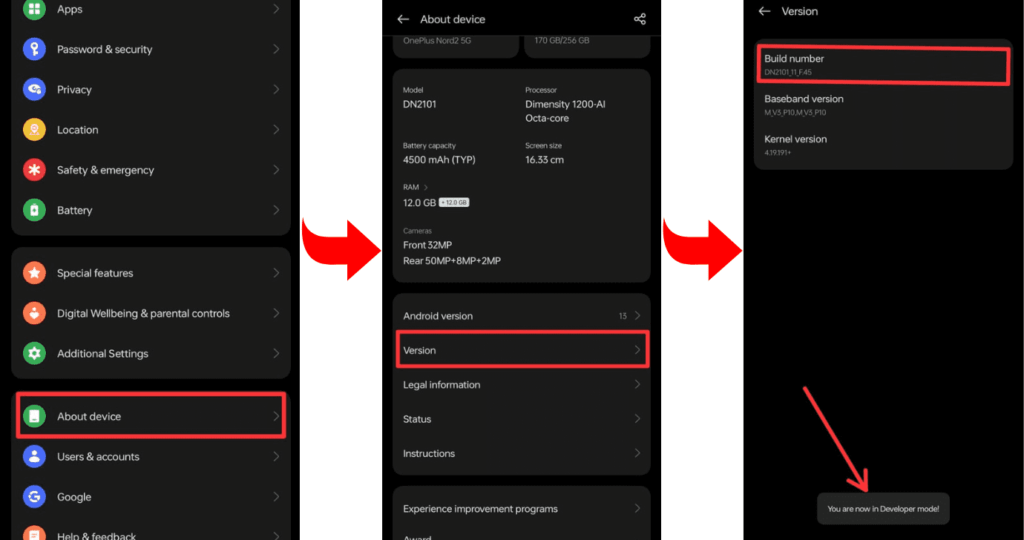
- Enable Developer Options: Go to device Settings, scroll down, and tap on >> “About phone” >> then tap on >> “Build number”, several times until >> “Developer Options” is activated.
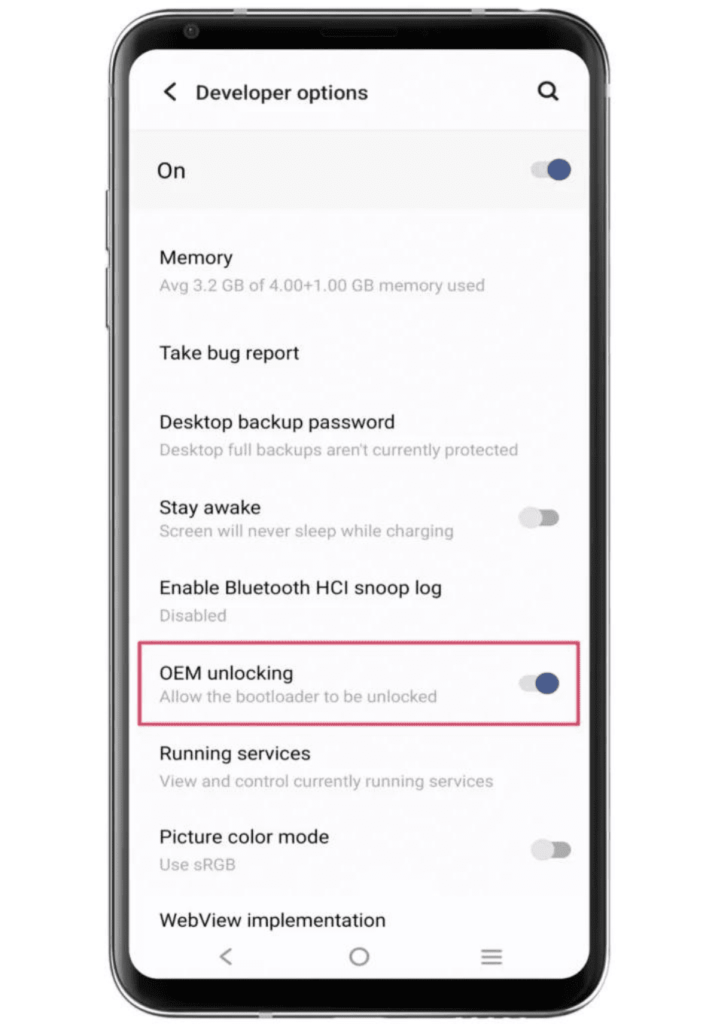
- Go to Settings and select “Developers Mode.” Now find the options “OEM Unlocking” and “USB Debugging” and enable them.

- Now boot your Google Pixel 7 into bootloader mode to Unlock the Bootloader.
- Connect the phone to the PC or Laptop using a USB cable.
- Type the command “fastboot oem unlock” in the terminal.
Step 2: Install and flash TWRP custom Recovery
- Download the file: Go to the TWRP official website and download the TWRP recovery file for your Google Pixel 7, according to your device’s model “Pixel 7” and brand “Google”. The file can be a string or in “img” format.
- Boot your phone into bootloader mode: To enter Bootloader Mode, you can press and hold your phone’s “Power button” and “Volume Down” buttons simultaneously. After that, you have to select “Bootloader” or “Fastboot” by using the “Volume Up/Down button”.
- Flashing TWRP Recovery: After getting your phone into Fastboot mode, use a USB cable and connect it to your PC.
- Flash the recovery: Now, open the flashing tool on your PC and select the TWRP recovery file of your phone. Select the appropriate option to flash the file, and wait for the process to complete.
If you need a TWRP installation guide, check out our related posts; you may know more about TWRP Custom Recovery.
Step 3: Get the correct Magisk Zip
We hope that you have completed the TWRP process, which we told you to do very carefully. So we assume that you have completed the TWRP flashing process on your Google Pixel 7. After that, you are ready to flash the Magisk zip files. So now you can download the Magisk zip files from below.
Step 4: Root using Magisk Zip
- Let’s start by booting TWRP custom recovery.
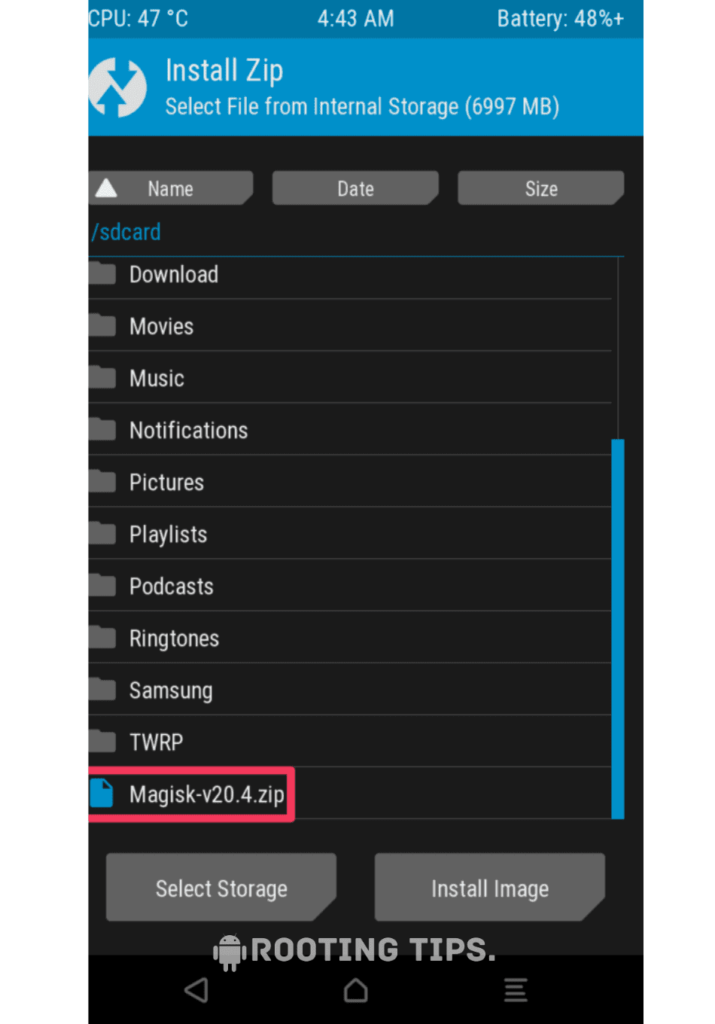
- Press on the “Install button” and find the “Magisk file”.

- Select the “.Zip” file from the shown list to open the flashing menu.
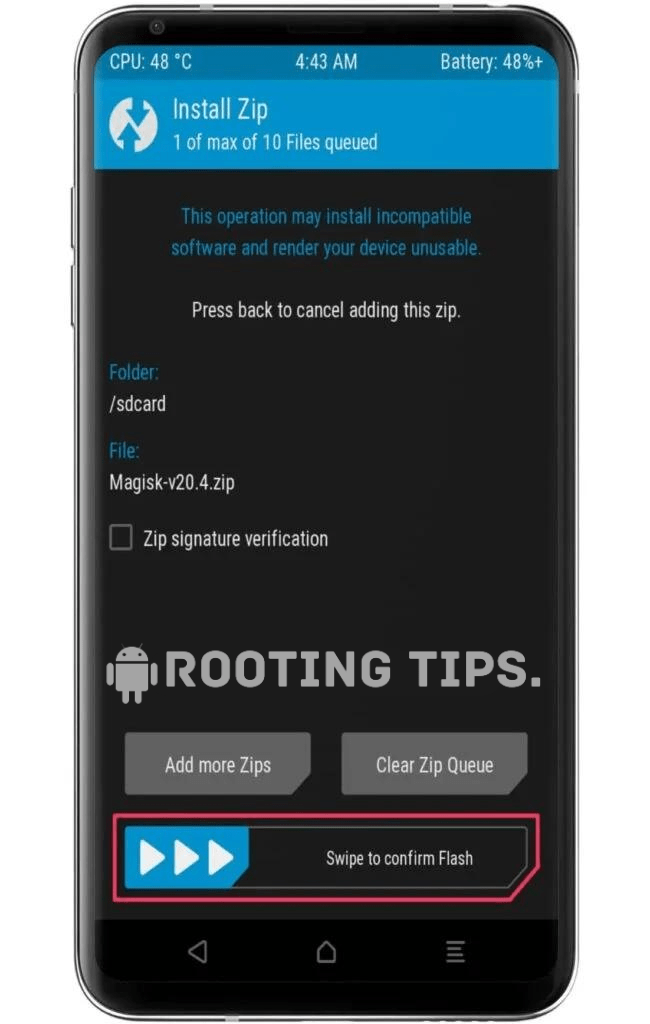
- “Swipe right” to start the flashing process.
- Reboot your device when the flashing process is complete.
Fantastic! The rooting of your Google Pixel 7 has been accomplished. Make use of all the rooting possibilities to customize your smartphone to your liking.
Frequently Asked Questions (FAQs)
Ans. Yes, Google Pixel phones can be rooted, and they are often popular choices among enthusiasts for their developer-friendly nature. However, rooting will void your warranty and may have security implications, so it should be done with caution and knowledge of the risks involved.
Ans. Yes, you can unroot your phone after rooting by using specific methods or software designed for unrooting. This process typically restores the phone to its original, non-rooted state, but it may not always reinstate warranties if they were voided during the rooting process.
Ans. Rooting itself doesn’t erase your phone’s data, but the process can carry risks, and mistakes could lead to data loss. It’s essential to back up your data before attempting to root your device, as some rooting methods may require unlocking the bootloader, which can erase data.
Conclusion
We have told you about Two methods of rooting in this article. And we hope that you have successfully rooted your Google Pixel 7 using the same methods. And if you can’t do it, then you can tell us about your problem, or if you have any problem understanding something, then you can tell us in the comment box. We will solve that problem and provide treatment for you. “Thank you”.