There are many ways to root, but we will cover the best way to root Google Pixel 8 Pro. So that you do not face any problems. All you have to do is follow the steps given, step by step. And rooting has some advantages and disadvantages as well. Which is important to know. So before rooting, we will discuss these.
What is Root?
Rooting Android means that you are trying to gain more control over your Android device. When you root your Android device, it allows you to make changes to your device’s system files and settings, giving you more control.
This means you can do things on your phone that are unavailable to a regular user, such as delete system applications, create backups, and make other changes.
Advantages or Benefits of rooting
- Customization: After rooting, you can completely customize and optimize your device. You can install new custom ROMs and customize your phone’s interface, icons, fonts, and other graphics according to your wishes.
- Backup and Restoration: You can create and easily restore complete backups of your device, keeping your important data safely preserved.
- Application and Network Control: You can have the freedom to deeply control the applications on your device, such as application blocking, update alerts, and Internet connection control.
- Battery Life and Performance: By rooting, you can improve battery life as you can control system processes and close blocking applications.
- Speed & Performance: You can boost your phone’s performance by removing unwanted apps and processes and increasing RAM and processing power independently.
Disadvantages or Cons of Rooting
- Non-Volume Continuous Updates: When you root your device, you will stop receiving official updates about installing new versions of the operating system. This means you may miss out on fixes and security updates that were originally meant for your device.
- Security Threat: By rooting a device, you can weaken its security system, which can increase the risk of your device being bricked. Rooted devices may be particularly vulnerable to the installation of unauthorized software.
- Losing Warranty: The warranty provided by most manufacturers can be voided by rooting an Android device.
- Risk of Data Loss: If you make a mistake in the rooting process, you may damage the data on your device, and it may be difficult to recover the data.
- Losing Status: Some applications and services do not work on rooted devices, which may lead to the loss of specific features of your device.
Pre Requirements:
- Data Backup: Rooting can damage your device’s data, so before rooting, make sure to back up your device’s important data and files in a safe place.
- Battery charge: Rooting can completely drain your device’s battery, so make sure that your device’s battery has more than 80% charge.
- Device version check: specifically check your device’s model number and version, because you will need to download the correct rooting method and some other files for your device.
- Internet access: You will need internet access. You need to download some unlocking tools and other things too.
- Correct USB Drivers and Cable: Install the correct USB drivers for your device on your PC And choose an original USB Cable. This will help you connect your phone to the PC properly.
Let’s Root Google Pixel 8 Pro
To root the Google Pixel 8 Pro, we explored various different techniques. The two techniques for rooting your device that are demonstrated here are, in our opinion, safe and simple. Both Method #1: Root your device without a PC and Method #2: Use the TWRP Custom Recovery to involve the procedure of rooting your device. But before you get started, make sure you’ve met all the conditions for effectively rooting your smartphone.
Warning:- Additionally, rooting can also increase some security risks, as it can leave your device out of a secure state and allow misuse. Therefore, root your device at your own risk.
Method #1: Root Google Pixel 8 Pro Without PC
- Download and install the KingoRoot app on your Google Pixel 8 Pro.
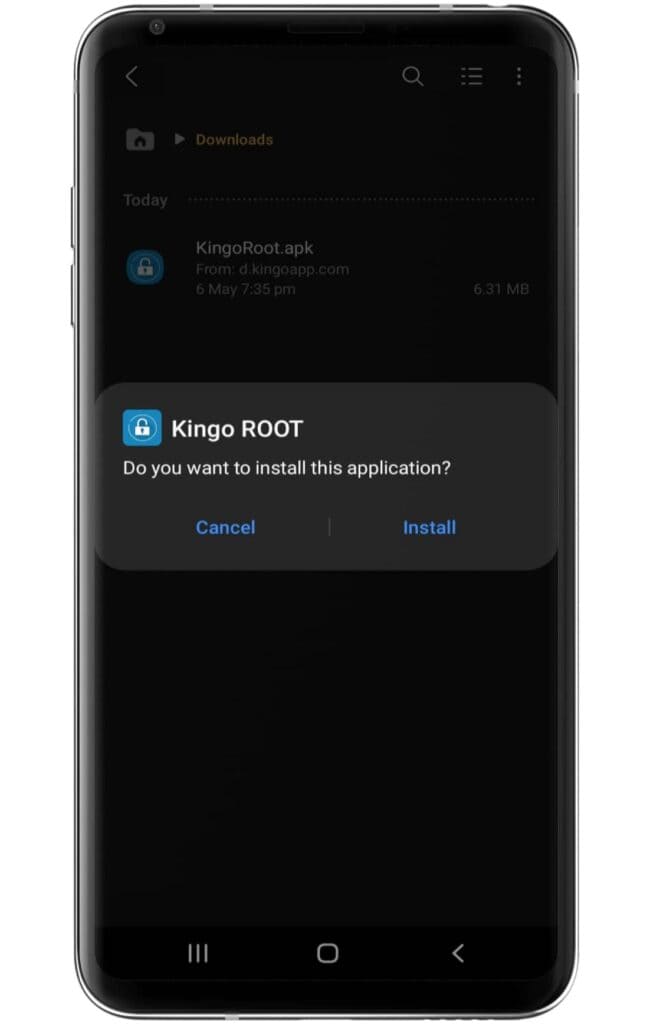
- Make sure to enable the “unknown source” settings on your device.
- Now, open the application and click on the One Click Root option.
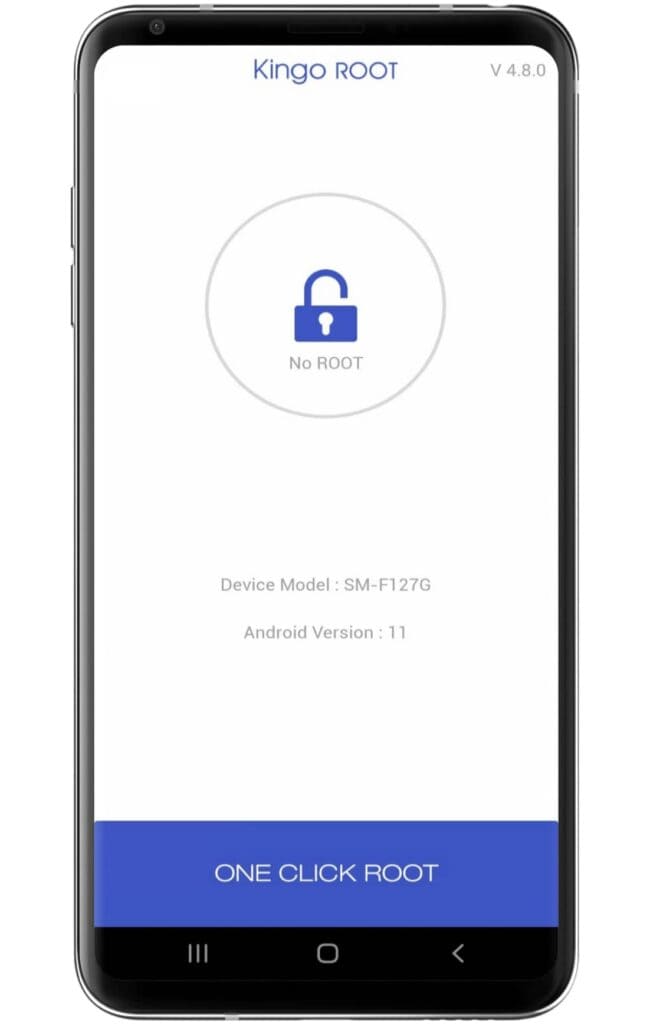
- Wait until the Rooting process ends on the Kingoroot app.
- Your Google Pixel 8 Pro will be successfully rooted once the process is finished. All root-related services may be utilized at your discretion.
Method #2: Using the TWRP Custom Recovery
Step 1: Unlock the bootloader
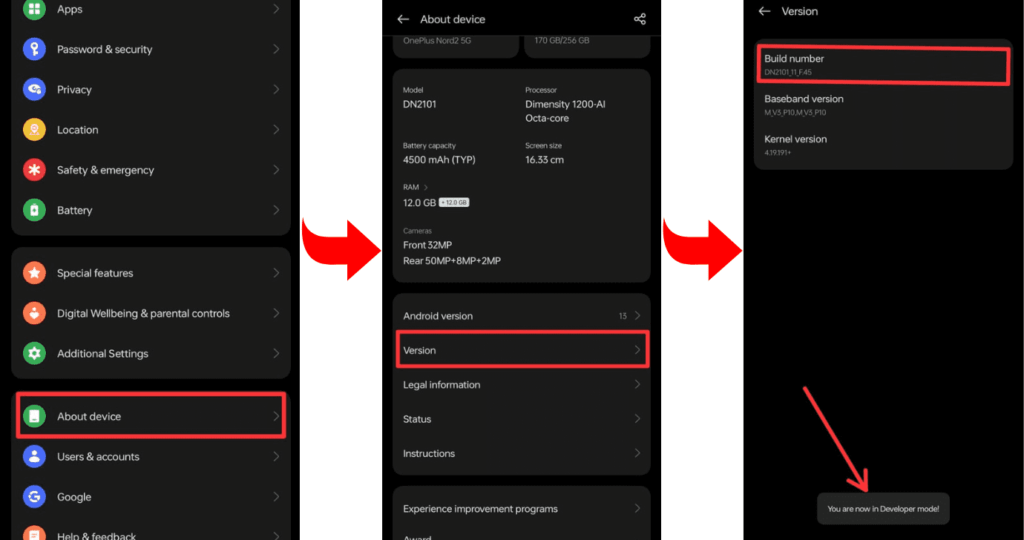
- Enable Developer Options: Go to device Settings, scroll down, and tap on >> “About phone” >> then tap on >> “Build number”, several times until >> “Developer Options” is activated.
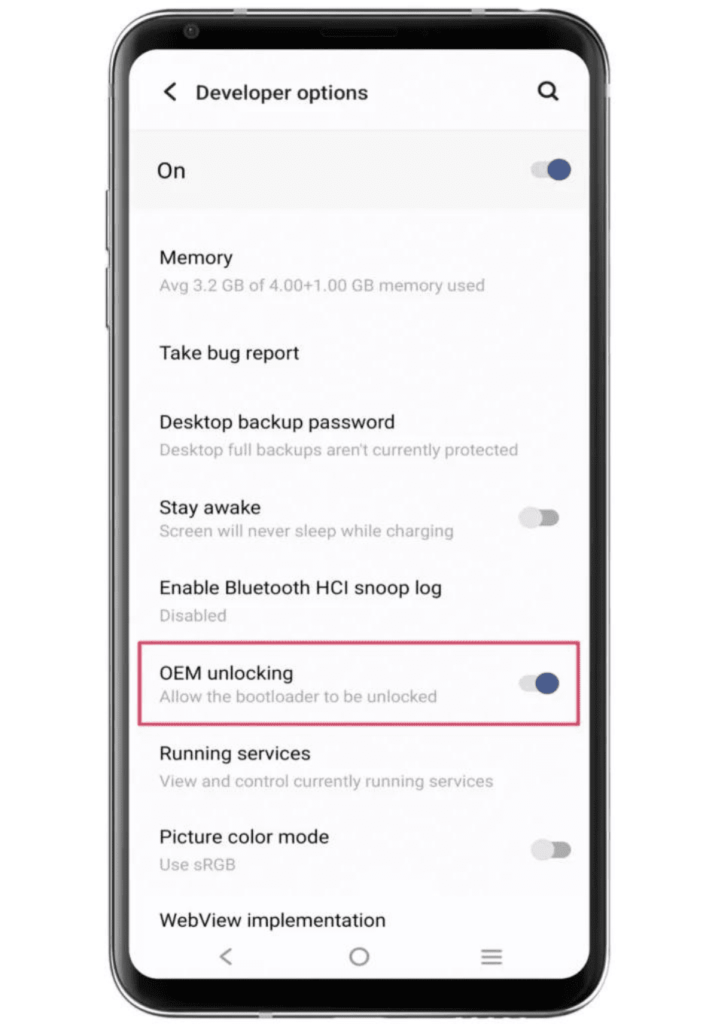
- Go to Settings and select “Developers Mode.” Now find the options “OEM Unlocking” and “USB Debugging” and enable them.

- Now boot your Google Pixel 8 Pro into bootloader mode to Unlock the Bootloader.
- Connect the phone to the PC or Laptop using a USB cable.
- Type the command “fastboot oem unlock” in the terminal.
Step 2: Install and flash TWRP custom Recovery
- Download the file: Go to the TWRP official website and download the TWRP recovery file for your Google Pixel 8 Pro, according to your device’s model “Pixel 8 Pro” and brand “Google”. The file can be a string or in “img” format.
- Boot your phone into bootloader mode: To enter Bootloader Mode, you can press and hold your phone’s “Power button” and “Volume Down” buttons simultaneously. After that, you have to select “Bootloader” or “Fastboot” by using the “Volume Up/Down button”.
- Flashing TWRP Recovery: After getting your phone into Fastboot mode, use a USB cable and connect it to your PC.
- Flash the recovery: Now, open the flashing tool on your PC and select the TWRP recovery file of your phone. Select the appropriate option to flash the file, and wait for the process to complete.
If you need a TWRP installation guide, check out our related posts; you may know more about TWRP Custom Recovery.
Step 3: Get the correct Magisk Zip
We assume that you have successfully completed the TWRP flashing process on your Google Pixel 8 Pro. Which we have already explained very well in the previous methods. So now you are ready to flash Magisk zip files. So now you can download the latest Magisk zip file given below.
Step 4: Root using Magisk Zip
- Let’s start by booting TWRP custom recovery.
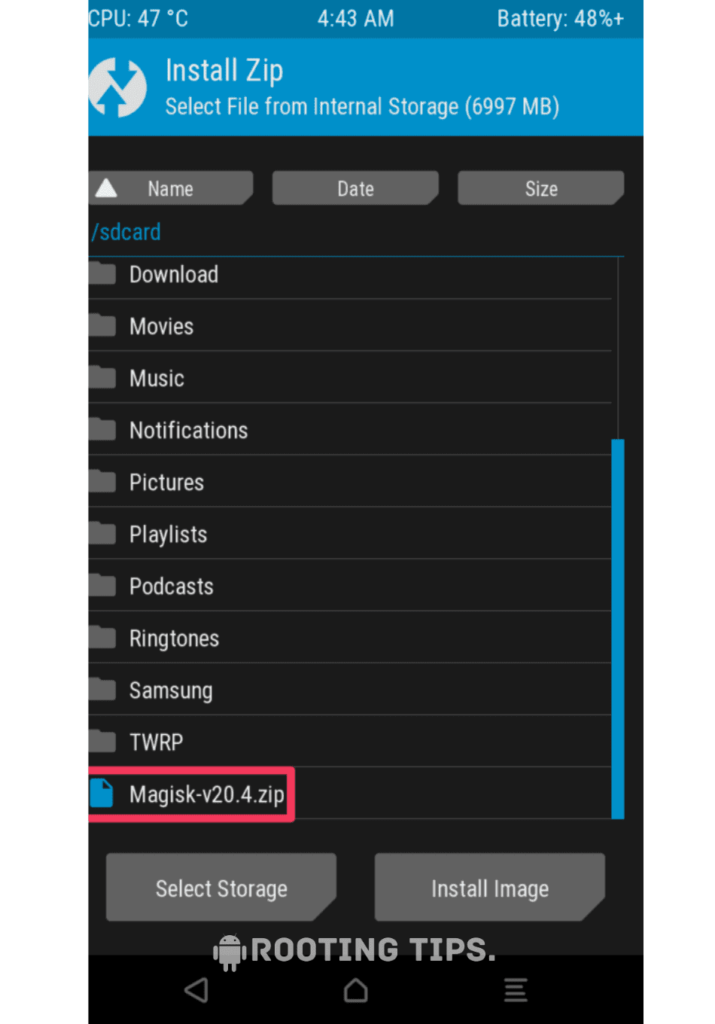
- Press on the “Install button” and find the “Magisk file”.

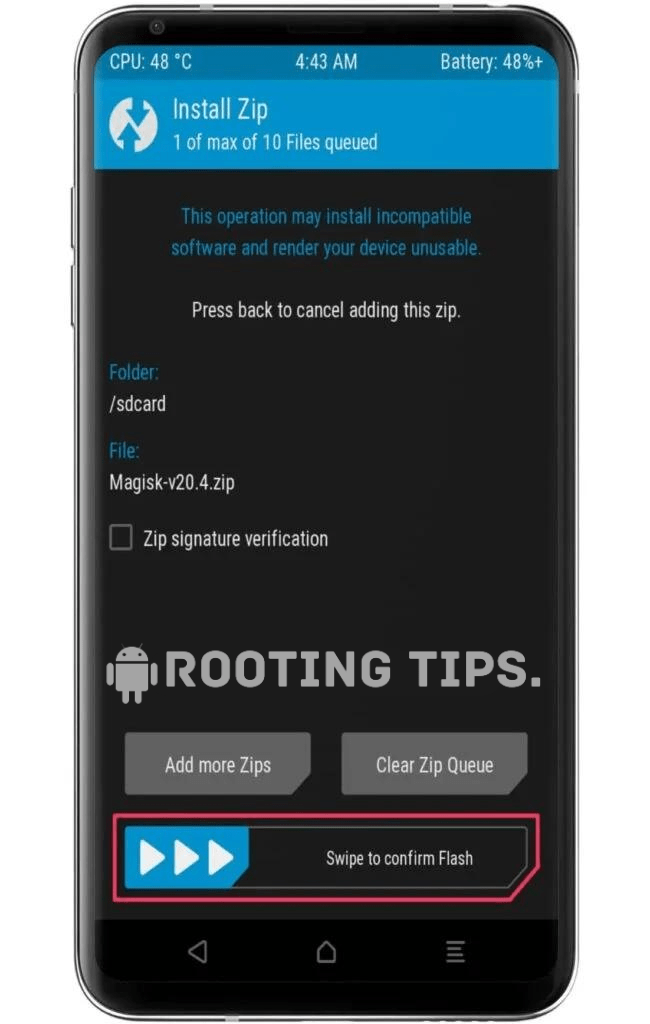
- Select the “.Zip” file from the shown list to open the flashing menu.
- “Swipe right” to start the flashing process.
- Reboot your device when the flashing process is complete.
AWESOME! Your Google Pixel 8 Pro has been successfully rooted. Utilize all rooting options and personalize your device as you choose.
Frequently Asked Questions (FAQs)
Ans. Rooting a Google Pixel can provide you with more control over your device, allowing for customization and the installation of apps that require root access. However, it may void your warranty, expose the device to security risks if not done carefully, and could lead to potential issues with future software updates from Google.
Ans. Rooting a phone itself won’t recover deleted photos. You may need specialized data recovery software, which can sometimes require root access to retrieve deleted photos from the device’s storage. However, success in recovering deleted data can vary depending on factors like how long ago the data was deleted and the phone’s storage management.
Ans. Magisk root is considered relatively safe compared to other rooting methods because it often provides systemless root access, which can be easier to manage and update without affecting system integrity. However, improper use or installing uncertified modules can still pose security and stability risks, so caution is advised.
Conclusion
At last, we have reached the end. And we hope that you have successfully rooted your Google Pixel 8 Pro. With the help of the method we described, there are many benefits to rooting, about which we have already spoken. Yes, and if you face any problems in the entire rooting process, you can tell us by writing in the comment box. We will try to solve it and deliver it to you. “Thank You”.
I wish I could root my Verizon pixel 8, I wish someone would figure that out. I’m like to hell with Verizon, I really hope someone could root it. it is suppose to be rooted from a phone made by Google. I really hope someone could figure that out.
Me too. Screw Verizon.