Today we will tell you how to root Infinix Smart 8 HD. There are many ways to root, but we will tell you the easiest way. So that you don’t face any problems. And by rooting, you get full rights to your device. With this, you can customize your device in many ways. So let’s root.
What is Root?
Rooting Android means gaining complete control over the Android operating system. When you root your device, you can access its system files and settings, allowing you to customize your device. This allows you to install new applications and interfere deeply with the system, but it can also void your device’s warranty.
Advantages or Benefits of rooting
- Freedom of Customization: After rooting, you can completely customize your device. You can use new themes, icons, and launchers that help you customize your device to your liking.
- Complete control of applications: Root provides enough control so that you can make system-level changes and manage applications well. You can install and delete applications without any limitations.
- Better Battery and Performance Support: Some rooted applications can extend battery life and improve system performance. This can help your device last even longer.
- Protection from unwanted applications and system processes: Rooting allows you to avoid unwanted applications and system processes that can harm your device.
- Superuser Access: After rooting, you get superuser access, allowing you to change all parts of the system and add new features as you wish.
Disadvantages or Cons of Rooting
- Unusable Applications: Many times after rooting, people use useless applications and applications that drain the battery instantly, which can force the device to use more power.
- Loss of Warranty: When you root your device, sometimes it may void your warranty. If any problem arises, it may not get support from the manufacturer.
- Security Threats: Rooting may reduce the security of the device as it allows the installation of unauthorized applications and software, which may increase the possibility of malware or viruses.
- Loss of Software Updates: Sometimes rooted devices may be delayed in receiving official software updates, which may impact security and stability.
- Bricking Risk: If something goes wrong while rooting, the device may become bricked, rendering it unusable.
Pre Requirements:
- Battery charge: Make sure to fully charge or exceed 90% of your device’s battery before rooting. Otherwise, your device’s battery may drain completely.
- Internet access: Internet access is very important in the rooting process, as you will need to know the unlock tool and some other stuff.
- Data Backup: Before rooting, keep in mind that rooting has the power to corrupt your device’s data, so it becomes necessary that you keep your data in a safe place.
- Correct USB Drivers and Cable: Install the correct USB drivers for your device on your PC and choose an original USB cable. This will help you connect your phone to the PC properly.
- Device version check: Carefully check your device’s model number and version, as you will need to learn the correct rooting method and download some files for your device.
Let’s Root Infinix Smart 8 HD
After trying various methods, we found two safe and easy methods to root your Infinix Smart 8 HD. But before rooting, make sure to fulfill the requirements for rooting safely. Method #1: Root your device without a PC, and Method #2: Use the TWRP Custom Recovery.
Warning:- Device warranties may be voided and security issues may arise from rooting. Because of this, rooting your smartphone comes with risks.
Method #1: Root Infinix Smart 8 HD Without PC
- Download and install the KingoRoot app on your Infinix Smart 8 HD.
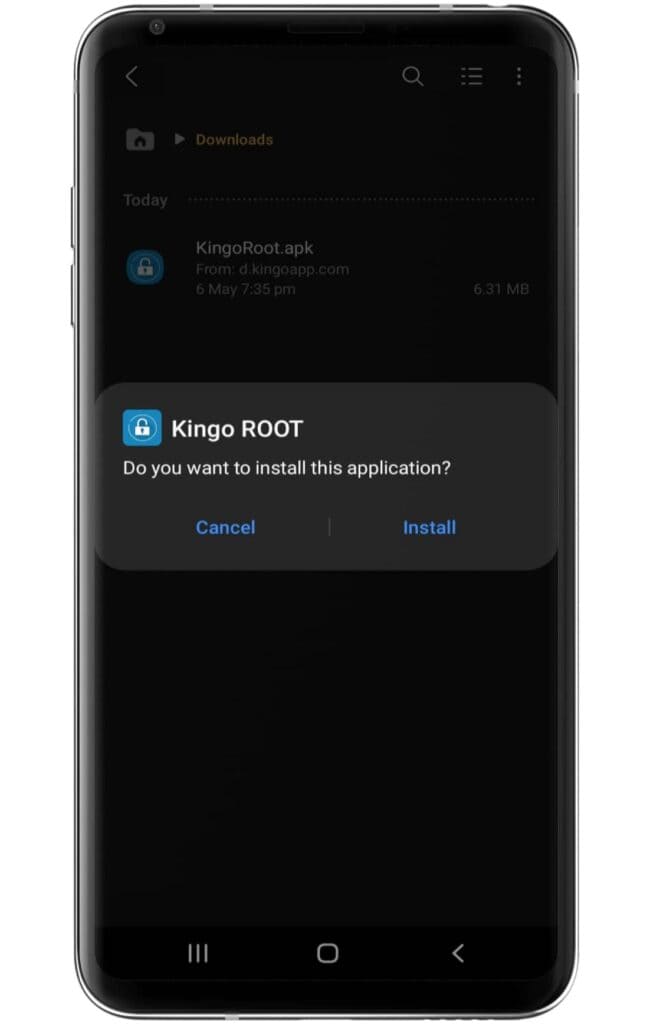
- Make sure to enable the “unknown source” settings on your device.
- Now, open the application and click on the One-Click Root option.
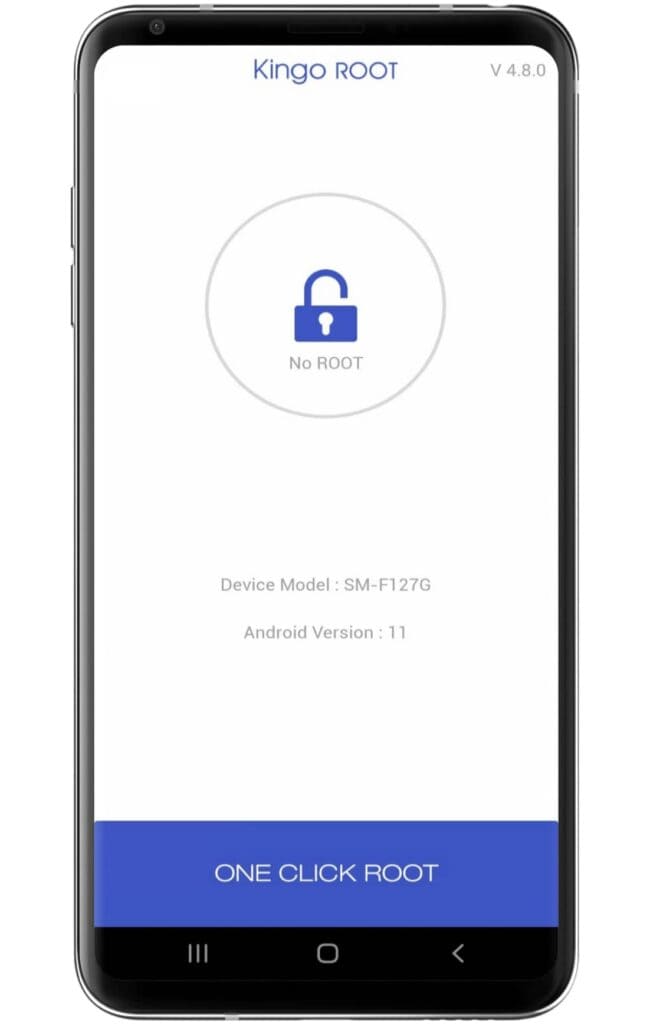
- Wait until the rooting process ends on the Kingoroot app.
- After completing the process, your Infinix Smart 8 HD has been successfully rooted.
Method #2: Using the TWRP Custom Recovery
Step 1: Unlock the bootloader
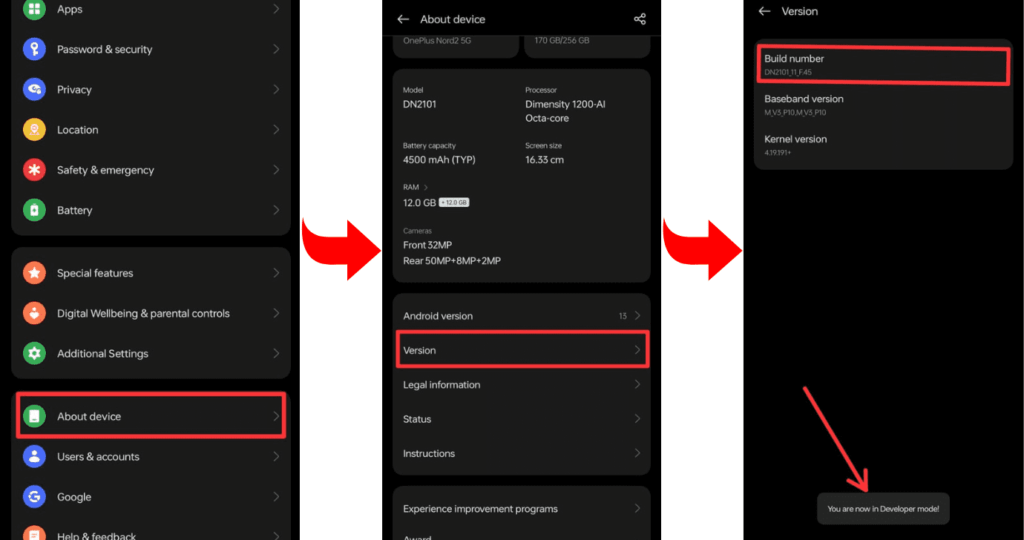
- Enable Developer Options: Go to device settings, scroll down, and tap on “About phone” then tap on “Build number”, several times until “Developer Options” is activated.
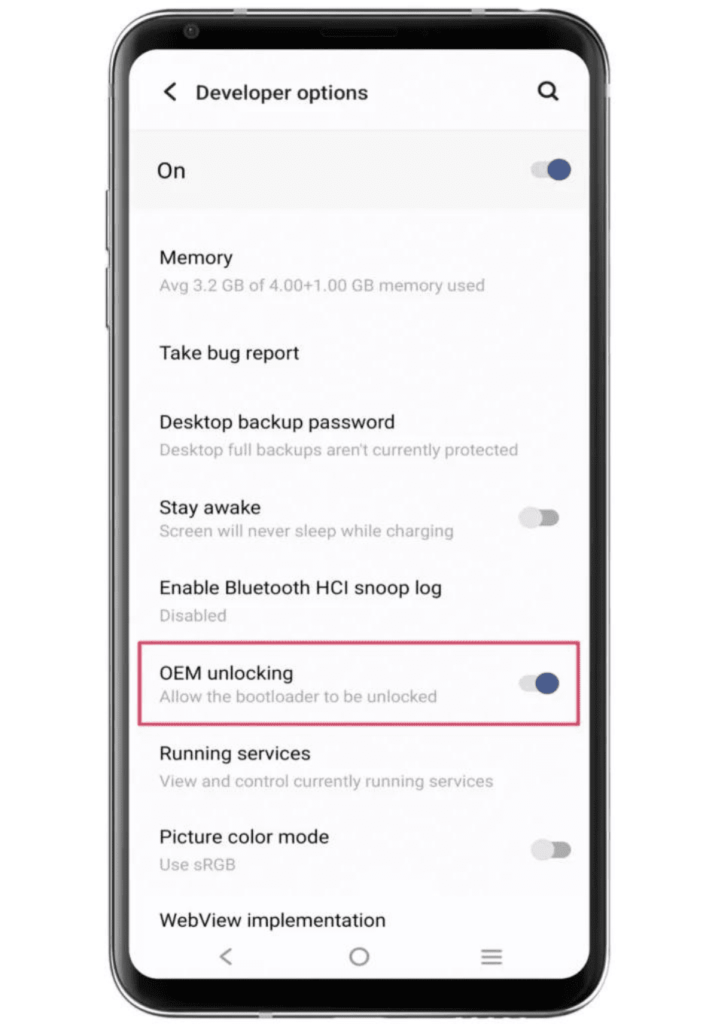
- Go to Settings and select “Developers Mode.” Now find the options “OEM Unlocking” and “USB Debugging” and enable them.

- Now boot your Infinix Smart 8 HD into bootloader mode to unlock the bootloader.
- Connect the phone to the PC or laptop using a USB cable.
- Type the command “fastboot oem unlock” in the terminal.
Step 2: Install and flash TWRP custom Recovery
- Download the file: Go to the TWRP official website and download the TWRP recovery file for your Infinix Smart 8 HD, according to your device’s model “Smart 8 HD” and brand “Infinix.” The file can be a string or in “img” format.
- Boot your phone into bootloader mode: To enter bootloader mode, you can press and hold your phone’s “Power button” and “Volume Down” buttons simultaneously. After that, you have to select “Bootloader” or “Fastboot” by using the “Volume Up/Down button”.
- Flashing TWRP Recovery: After getting your phone into Fastboot mode, use a USB cable and connect it to your PC.
- Flash the recovery: Now, open the flashing tool on your PC and select the TWRP recovery file on your phone. Select the appropriate option to flash the file, and wait for the process to complete.
If you need a TWRP installation guide, check out our related posts; you may know more about TWRP Custom Recovery.
Step 3: Get the correct Magisk Zip
We are assuming that you have completed the TWRP flashing process on your Infinix Smart 8 HD. That will tell you very much about the earlier step. After completing the TWRP process, you are ready to flash the Magisk zip files. So now download the latest Magisk zip files, which are given below.
Step 4: Root using Magisk Zip
- Let’s start by booting TWRP Custom Recovery.
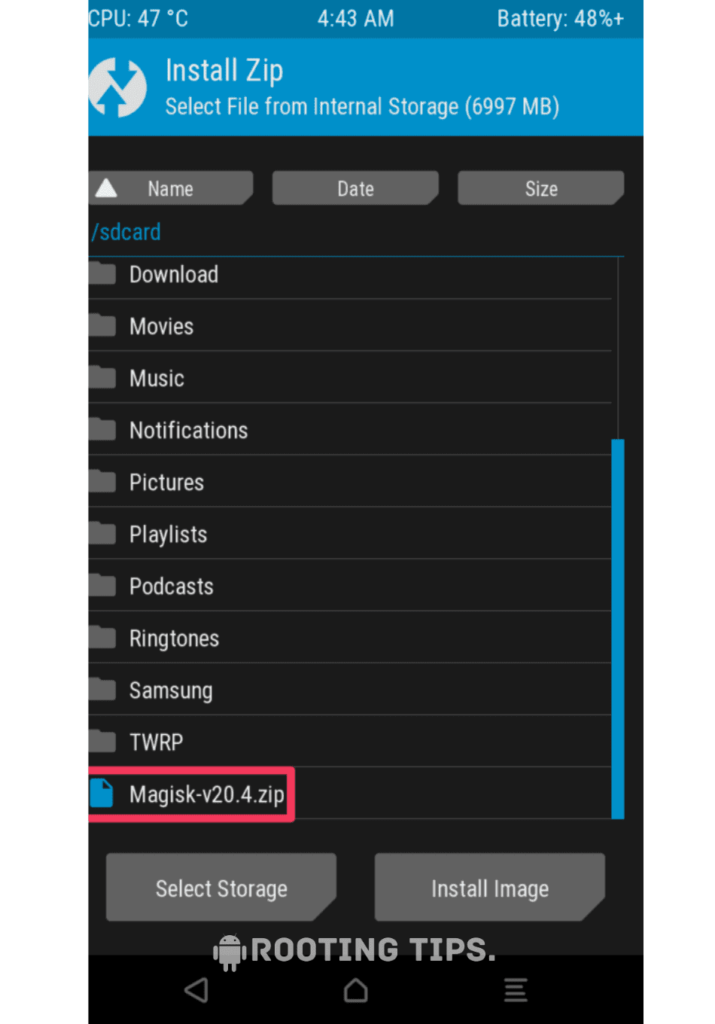
- Press the “Install button” and find the “Magisk file”.

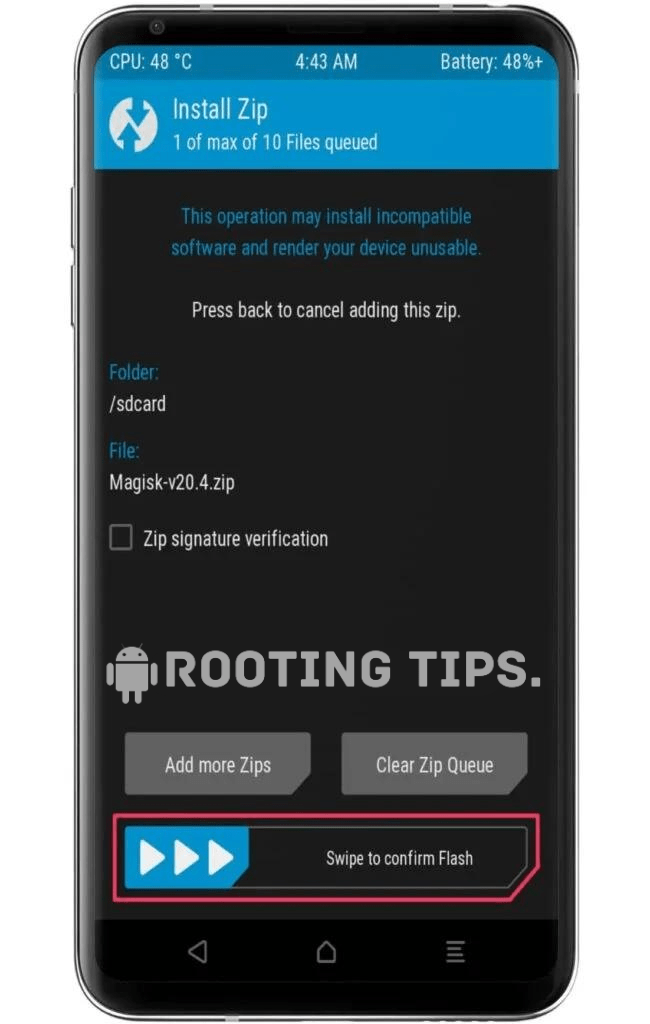
- Select the “.zip” file from the shown list to open the flashing menu.
- “Swipe right” to start the flashing process.
- Reboot your device when the flashing process is complete.
Amazing! You’ve successfully rooted your Infinix Smart 8 HD. And you’re a “superuser” now. You can configure your device to have administrator-level access.
Frequently Asked Questions (FAQs)
Ans. Yes, both root and jailbreak involve gaining elevated access to a device’s operating system, allowing users to customize and modify it beyond normal restrictions. However, “root” is more commonly associated with Android devices, while “jailbreak” is used for iOS devices like iPhones.
Ans. Rooting alone doesn’t necessarily make phones faster, but it can enable users to optimize performance by removing bloatware and using custom ROMs. However, improper modifications can also lead to instability and slow down the device.
Ans. Yes, you can unroot your phone by using specific apps or flashing the official firmware. It’s important to follow proper procedures to avoid potential issues, and unrooting will typically restore your device to its original state. Keep in mind that unrooting may void warranties or impact certain functionalities.
Conclusion
We have told you about many methods of rooting. So that you do not face much trouble during rooting, we hope that you have rooted your Infinix Smart 8 HD properly. If you face any problems during rooting, then let us know, and we will try to find a solution. And thank you for reading this article until now.