Hello friends, If you are looking for an easy and safe way to root your Motorola G52, then you do not need to go anywhere; we are going to give you all the information related to rooting in this article, so stay with us till the end. If you are having difficulty understanding any step, then you will get help for that too.
What is Root?
Rooting Android is a process by which you can gain official control over your Android device and gain superuser rights. This means you can make deep changes to your device’s system files and settings that you normally couldn’t.
After rooting, you can install new apps, make your own custom changes to system settings, and adjust device performance and security. But this should be done carefully, because if you accidentally do something wrong, you may risk bricking your device, which may also void your warranty.
Advantages or Benefits of rooting
- Advanced Security: Rooting allows you to enhance device security, such as by allowing application control with a firewall and setting limits on device access.
- Complete Control: Rooting gives you complete control over your device. It gives you the freedom to modify all the system files and settings of your smartphone.
- Custom ROMs: Rooting allows you to use custom ROMs, which you can install to customize the operating system of your device as per your needs.
- Battery Backup: Rooting allows you to backup the battery, and by doing so, your data and applications remain safe when your device is lost.
- Advanced Applications: On a rooted device, you can use a variety of advanced applications and tools that go beyond the normal use of your device.
Disadvantages or Cons of Rooting
- Loss of warranty: By rooting, you often lose the warranty of your device, due to which you have no right to get it satisfied.
- Security Concerns: When you root your device, you put its security at risk. Rooting opens up more access for a potential attacker, and your device can be hacked.
- Non-official software: When you root, you can install non-official software on your device, which means you may not get properly supported updates for your device.
- System State: Many times after rooting, the system state of the device may be affected, causing your device to not function properly.
- Data Loss: During the rooting process, data loss on your device may occur, which means the loss of your documents, photos, and other important data.
Pre Requirements:
- Data Backup: Before rooting, keep your device’s data in a safe place because rooting can damage your device’s data.
- Battery charge: Your device’s battery should be more than 80% charged while rooting. Otherwise, your device’s battery may drain completely.
- Device version check: Double-check the model number and version of your device, as you will need the correct rooting method and files to download to it.
- Internet access: You will definitely need internet access to download the unlock tool and other things.
- Correct USB Drivers and Cable: Install the correct USB drivers for your device on your PC and choose an original USB cable. This will help you connect your phone to the PC properly.
Let’s Root Motorola G52
We will use two methods to root your Motorola G52: The first method roots your device without a PC; the second method uses TWRP Custom Recovery. and the third Method Uses Fastboot and ADB Please complete the prerequisites before rooting to safely root your device.
Warning:- Please note that rooting comes with some risks and security issues and may void your device’s warranty. So root your device at your own risk.
Method #1: Root Motorola G52 Without PC
- Download and install the KingoRoot app on your Motorola G52.
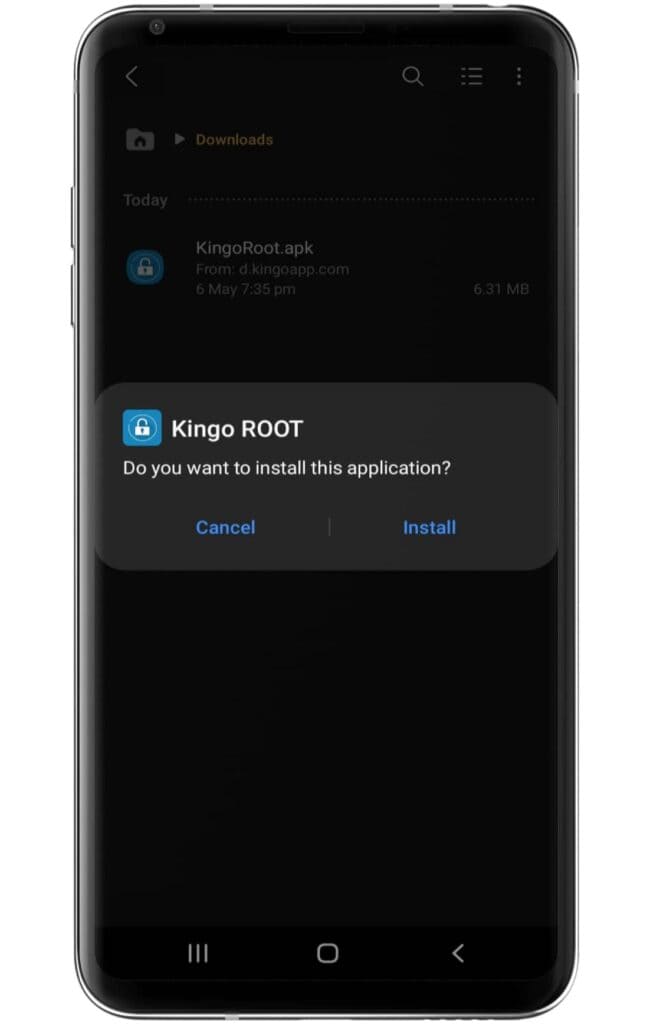
- Make sure to enable the “unknown source” settings on your device.
- Now, open the application and click on the One-Click Root option.
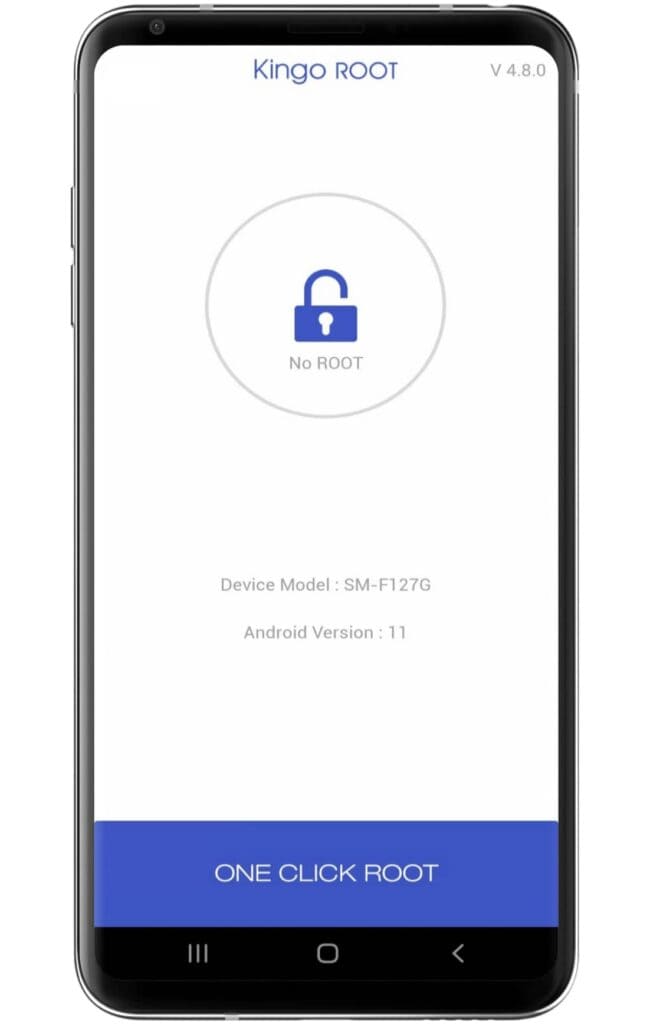
- Wait until the rooting process ends on the Kingoroot app.
- After completing the process, your Motorola G52 has been successfully rooted.
Method #2: Using the TWRP Custom Recovery
Step 1: Unlock the bootloader
- Enable Developer Options: Go to device Settings, scroll down, and tap on >> “About phone” >> then tap on >> “Build number”, several times until >> “Developer Options” is activated.
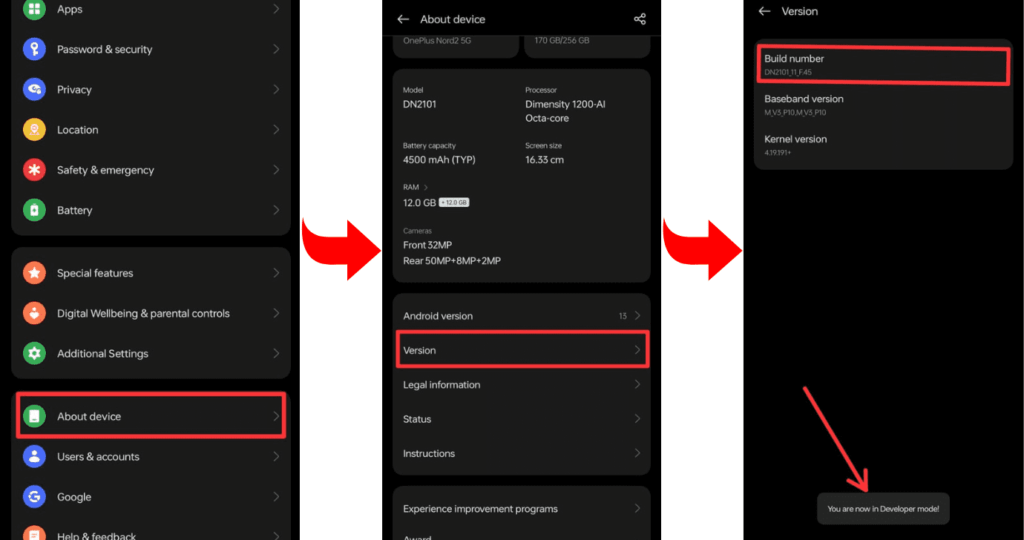
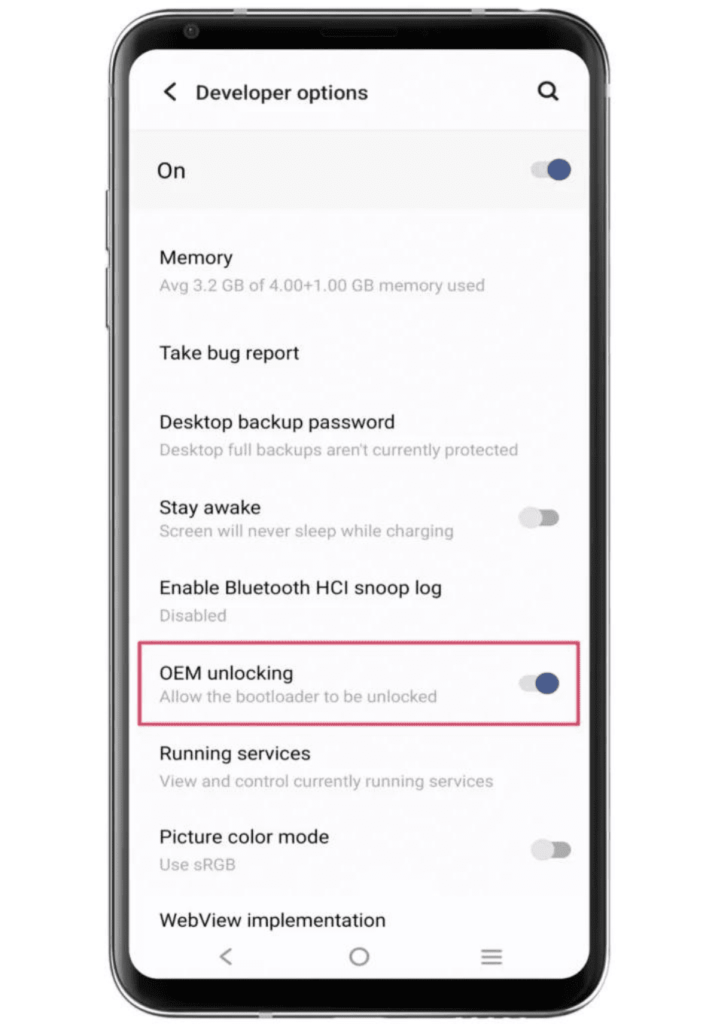
- Go to Settings and select “Developers Mode.” Now find the options “OEM Unlocking” and “USB Debugging” and enable them.

- Now boot your Motorola G52 into bootloader mode to Unlock the Bootloader.
- Connect the phone to the PC or laptop using a USB cable.
- Type the command “fastboot oem unlock” in the terminal.
Step 2: Install and flash TWRP custom Recovery
- Download the file: Go to the TWRP official website and download the TWRP recovery file for your Motorola G52, according to your device’s model “G52” and brand “Motorola”. The file can be a string or in “img” format.
- Boot your phone into bootloader mode: To enter bootloader mode, you can press and hold your phone’s “Power button” and “Volume Down” buttons simultaneously. After that, you have to select “Bootloader” or “Fastboot” by using the “Volume Up/Down button”.
- Flashing TWRP Recovery: After getting your phone into Fastboot mode, use a USB cable and connect it to your PC.
- Flash the recovery: Now, open the flashing tool on your PC and select the TWRP recovery file on your phone. Select the appropriate option to flash the file, and wait for the process to complete.
If you need a TWRP installation guide, check out our related posts; you may know more about TWRP Custom Recovery.
Step 3: Get the correct Magisk Zip
We hope you have completed the TWRP process, which we explained very well in the previous method. So we assume that you have completed the TWRP flashing process on your Motorola G52. After this, you are ready to flash the Magisk zip files. So now you can download the Magisk zip files from below.
Step 4: Root using Magisk Zip
- Let’s start by booting TWRP Custom Recovery.
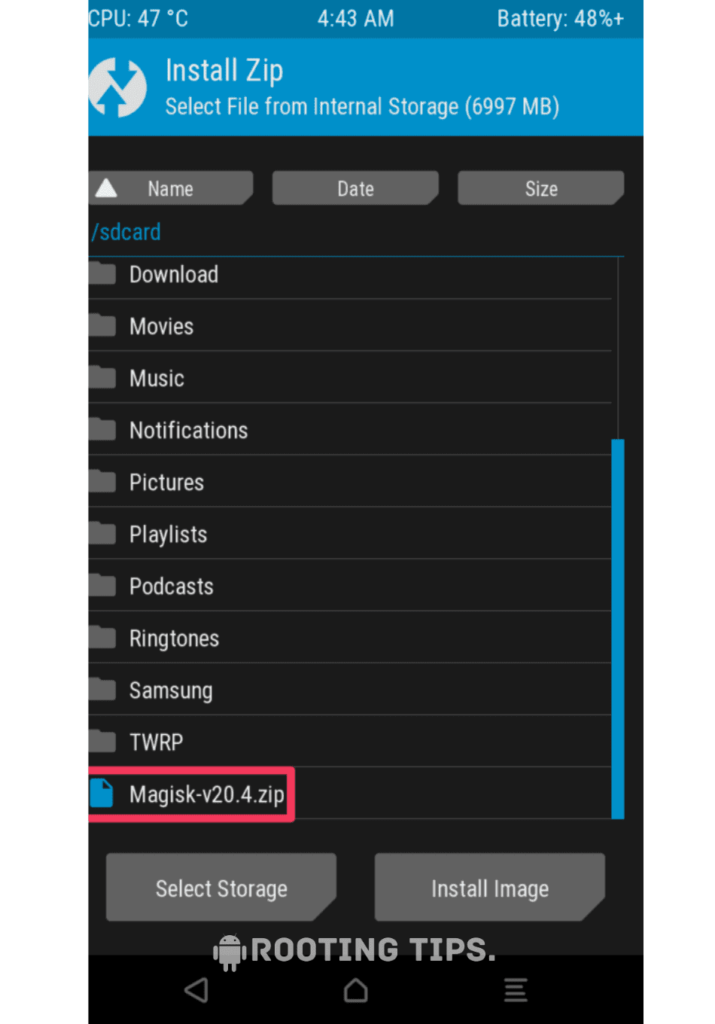
- Press the “Install button” and find the “Magisk file”.

- Select the “.Zip” file from the shown list to open the flashing menu.
- “Swipe right” to start the flashing process.
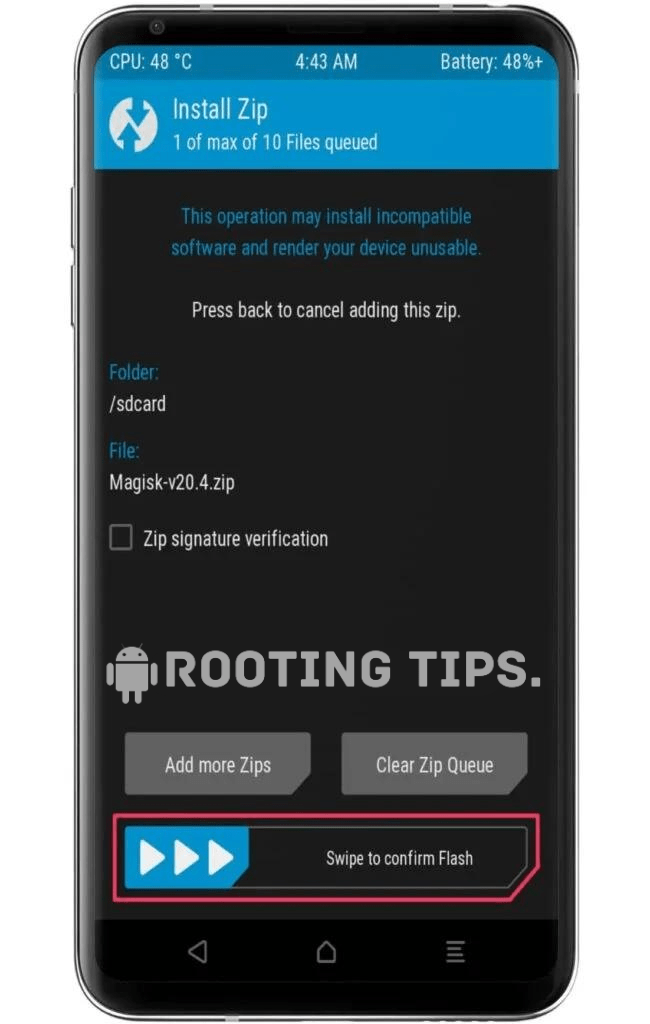
- Reboot your device when the flashing process is complete.
Method #3: Using Fastboot and ADB
Download platform tools and ADB drivers for your PC or laptop.
- Go to Settings >> About Phone >> Tap on “Build Number” several times until “Developer Mode” is enabled.
- Access the “Developer option” to enable “USB debugging” and “OEM unlocking.”.
- Connect your smartphone to the PC or laptop using the “USB Cable”.
- Open the platform tool folder and type “cmd” in the folder’s search bar.
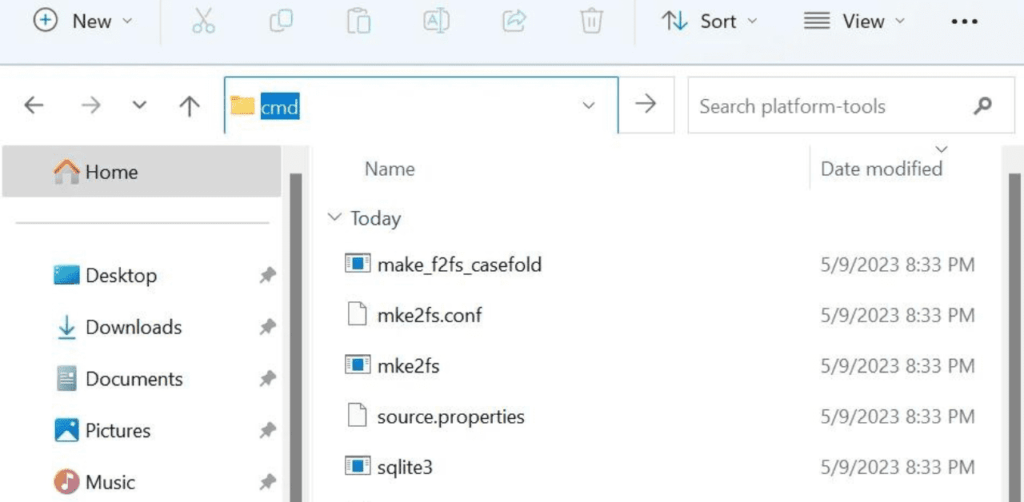
- A terminal window or command prompt will display on the screen.
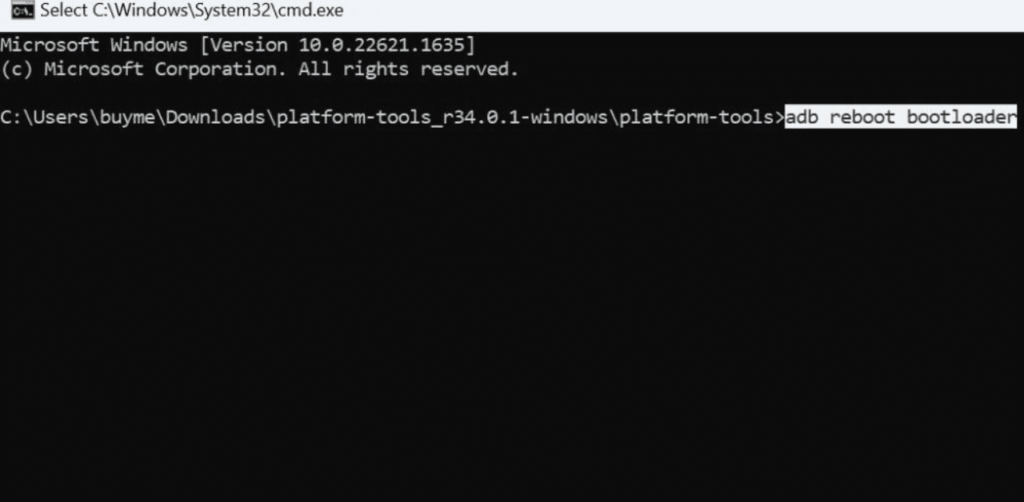
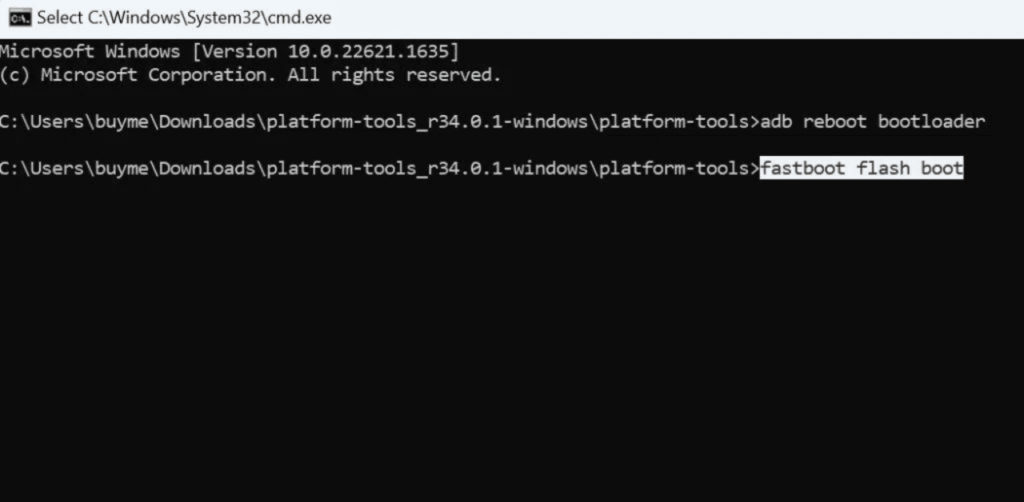
- Now type the first command, “adb reboot bootloader”. to boot into the bootloader.
- Now, enter the command “fastboot flash boot” and choose Magisk_file.zip. then hit Enter to start the flashing process on your device.
- Finally, type the command “fastboot reboot” to reboot your Motorola G52.
Now you can use the rooting-related services on your Motorola G52. Your device has been successfully rooted.
How to uninstall Magisk on a Motorola G52?
If you want to unroot your Motorola G52 for any reason, then simply follow the steps given below. To unroot your device.
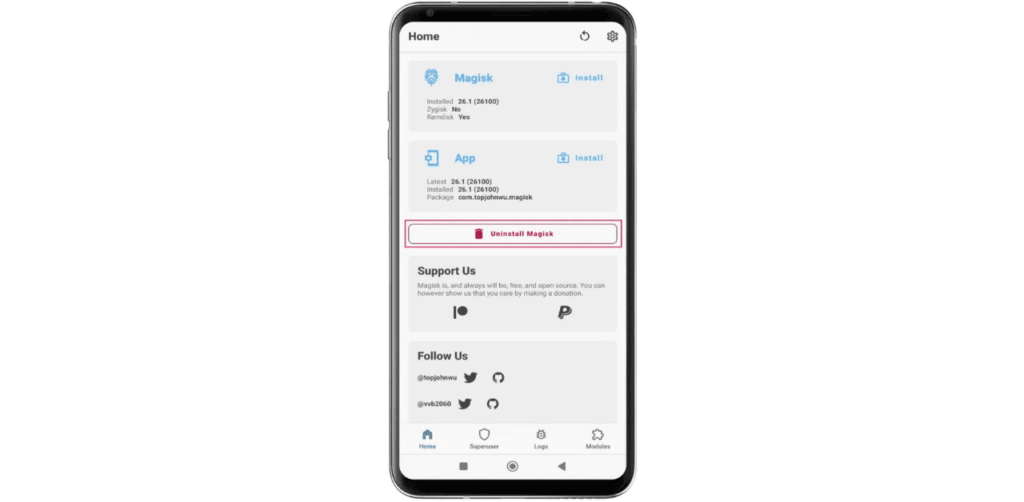
- Open the Magisk app on your Motorola G52.
- Go to the “Settings” menu Tap (three horizontal lines) in the upper-left corner, and then select “Settings”.
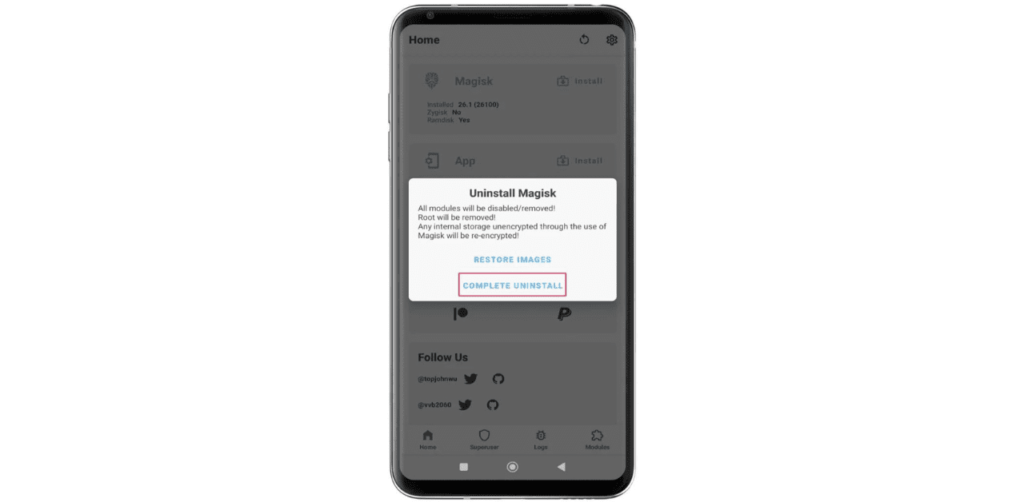
- Scroll down in the Settings menu and tap the “Uninstall” button.
- Follow the prompts to “uninstall Magisk” and restore your device to its original, unrooted state.
Frequently Asked Questions (FAQs)
Ans. Rooting can potentially slow down your phone if not done correctly or if you install resource-intensive apps, but it can also improve performance when used wisely.
Ans. A rooted device can be powerful, granting full control and customization, but it also carries risks like security vulnerabilities and voided warranties. Its power depends on how responsibly it’s used.
Ans. A factory reset will typically remove root access from a rooted device, restoring it to its original state. However, it’s essential to note that the specific outcome may vary depending on the device and rooting method used. Always back up important data before performing a factory reset.
Conclusion
So, friends, If you have come to the end of our article, then you must have started rooting your Motorola G52, and I hope that you will root easily by following our steps. If you still face any problems, then you can tell us in the comment box or by mail, and we will help you completely.