Today in this article, we will tell you how you can root your Redmi 13C without any problems. By rooting, you get full rights to your device, through which you can make many types of changes to your device. You can also customize your device in many ways. So let’s proceed with the rooting process.
What is Root?
Obtaining privileged access to the Android operating system, also known as root access or superuser permissions, is the process of rooting an Android device. It enables users to alter the software code, access the complete Android file system, and make modifications that are typically prohibited by the carrier or device maker.
Advantages or Benefits of rooting
- Super Manageability: When you root your device, you can access all of its system files and settings, allowing you to customize your device very individually.
- Installing Custom Software: Rooting allows you to install various custom ROMs and custom software on your device, which can help in giving you new features and customizations.
- Extending Battery Life: Some root applications can help extend battery life, as they are able to control unwanted processes.
- Increased Computing Speed: Rooting can increase the computing speed of your device as you can reduce system limits and unnecessary processes.
- Use of Unrooted Applications and Features: On a rooted device, you can use unrooted applications and features that are generally not available on unrooted devices.
Disadvantages or Cons of Rooting
- Loss of Warranty and Support: When you root your device, your non-official warranty may be voided, and user support may also be lost.
- Security Breaches: Rooting gives users greater freedom, but it can leave the device unsecured and put you at risk of unauthorized applications.
- Loss of Updates and Automatic Updates: On a rooted device, you may not have the benefit of automatic updates, which may cause you to miss out on new security fixes.
- Risk of Bricking: If something goes wrong with the rooting process, your device may get bricked, ruining the user’s entire device.
- Malware and Security Threats: Rooted devices may face malware and other security threats as you are now out of Google’s security mechanisms.
Pre Requirements:
- Data Backup: Rooting has the capability to corrupt your device’s data, so before rooting, keep your device’s data in a safe place.
- Battery charge: During rooting, make sure your device has more than 80% charge. Otherwise, your device’s battery may drain completely.
- Correct USB Drivers and Cable: Install the correct USB drivers for your device on your PC and choose an original USB cable. This will help you connect your phone to the PC properly.
- Device version check: Check your device’s model number and version in full detail, because you will need to download the correct rooting method and other files for your device.
- Internet access: While rooting, you need internet access. You need to download some files and unlock tools.
Let’s Root Redmi 13C
Before deciding on two safe and easy methods to root your Redmi 13C, we investigated a lot of different approaches. But before you start, make sure you fulfill all the requirements for a secure rooting procedure. Method 1: Root your gadget without using a computer The second technique is called TWRP Custom Recovery.
Warning:- Rooting your smartphone could break the warranty and introduce security risks. You thus undertake this risk when rooting your smartphone.
Method #1: Root Redmi 13C Without PC
- Download and install the KingoRoot app on your Redmi 13C.
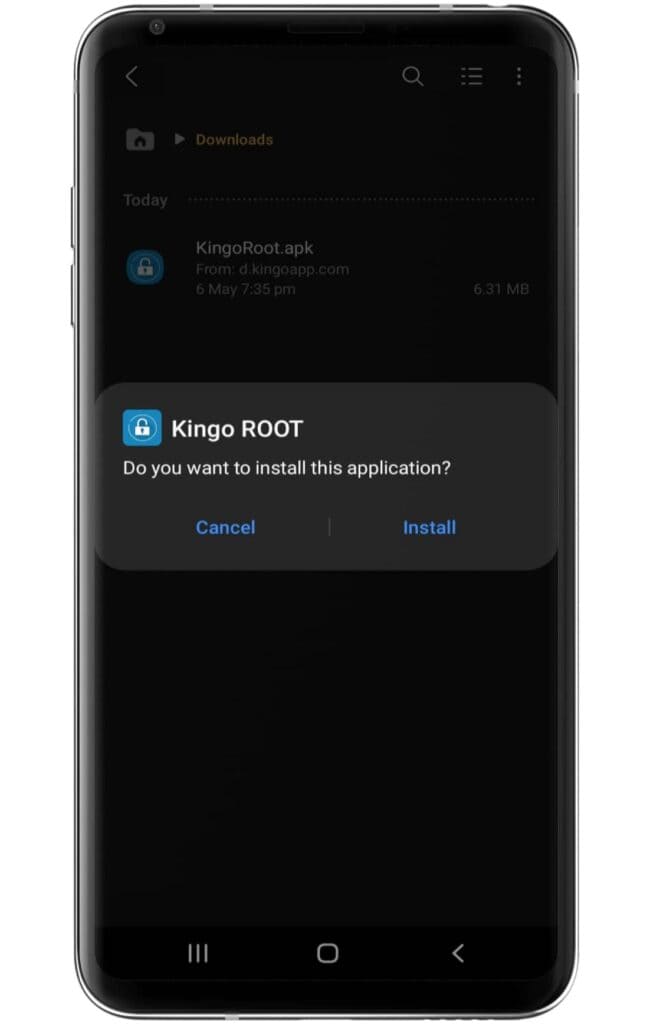
- Make sure to enable the “unknown source” settings on your device.
- Now, open the application and click on the One-Click Root option.
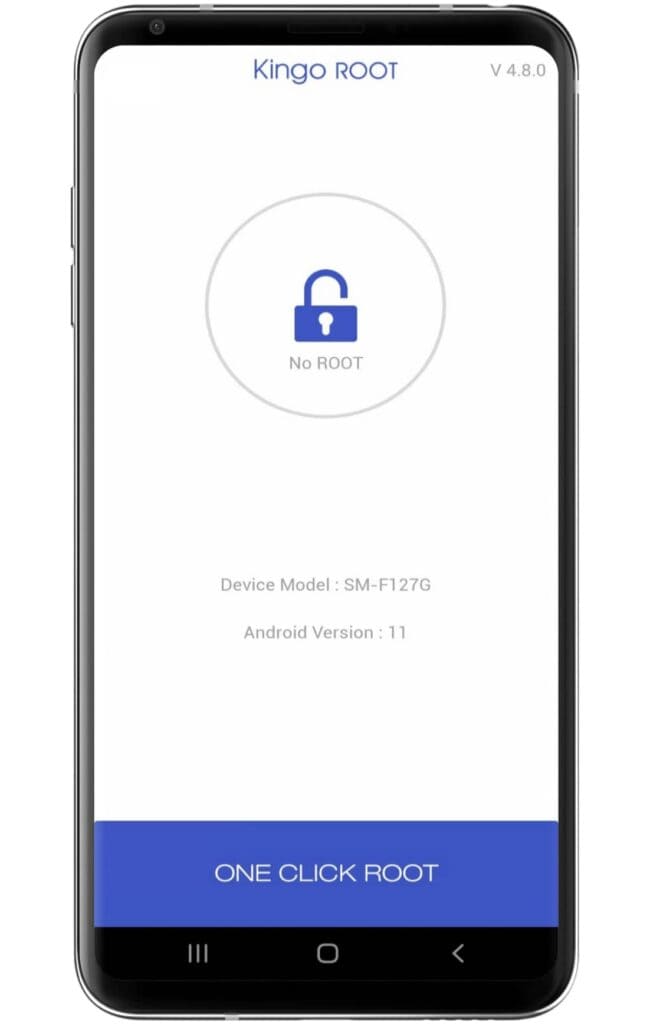
- Wait until the rooting process ends on the Kingoroot app.
- After completing the process, your Redmi 13C has been successfully rooted.
Method #2: Using the TWRP Custom Recovery
Step 1: Unlock the bootloader
- Enable Developer Options: Go to device settings, scroll down, and tap on “About phone” then tap on “Build number”, several times until “Developer Options” is activated.
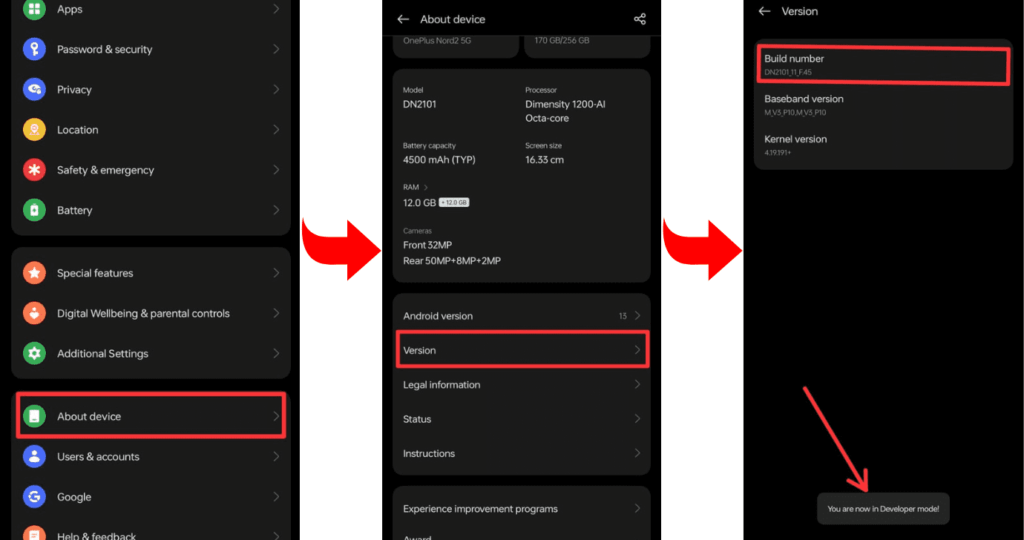
- Go to Settings and select “Developers Mode.” Now find the options “OEM Unlocking” and “USB Debugging” and enable them.
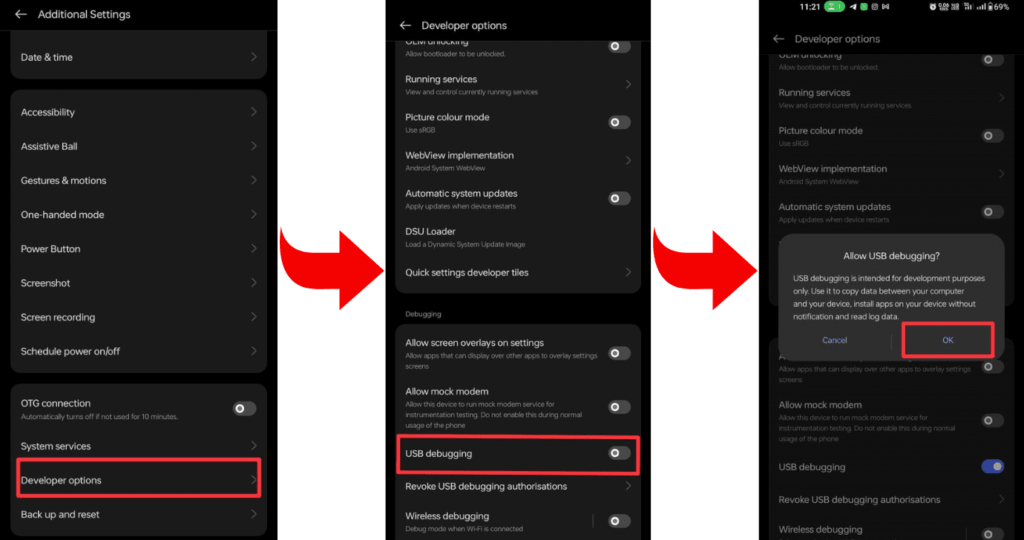
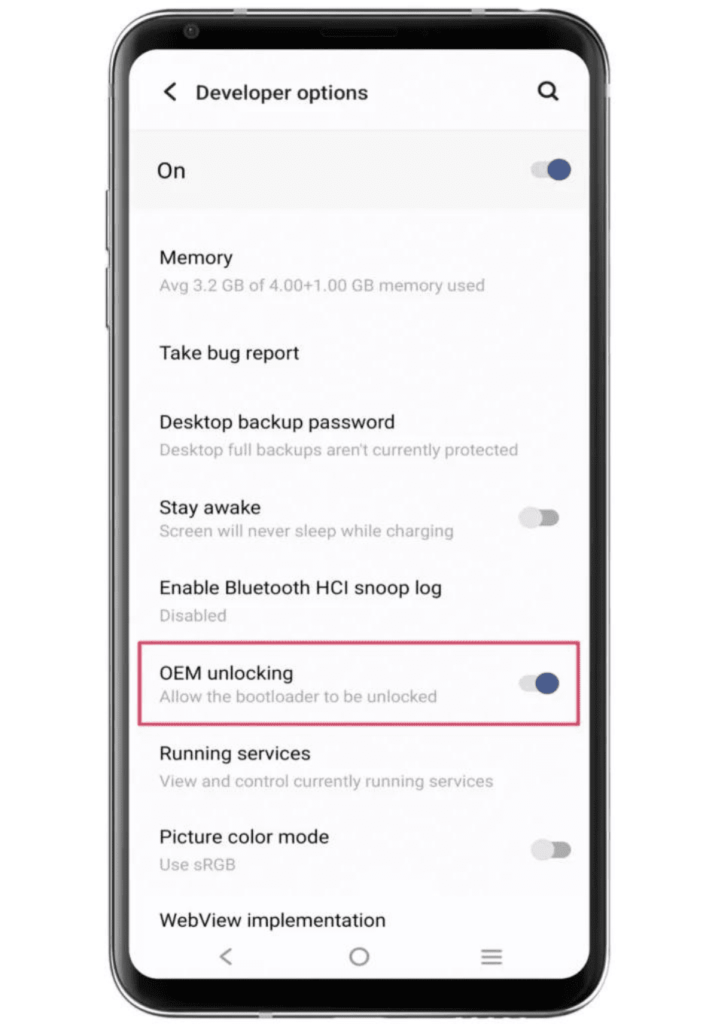
- Now boot your Redmi 13C into bootloader mode to unlock the bootloader.
- Connect the phone to the PC or laptop using a USB cable.
- Type the command “fastboot oem unlock” in the terminal.
Step 2: Install and flash TWRP custom Recovery
- Download the file: Go to the TWRP official website and download the TWRP recovery file for your Redmi 13C, according to your device’s model “13C” and brand “Redmi.” The file can be a string or in “img” format.
- Boot your phone into bootloader mode: To enter bootloader mode, you can press and hold your phone’s “Power button” and “Volume Down” buttons simultaneously. After that, you have to select “Bootloader” or “Fastboot” by using the “Volume Up/Down button”.
- Flashing TWRP Recovery: After getting your phone into Fastboot mode, use a USB cable and connect it to your PC.
- Flash the recovery: Now, open the flashing tool on your PC and select the TWRP recovery file on your phone. Select the appropriate option to flash the file, and wait for the process to complete.
If you need a TWRP installation guide, check out our related posts; you may know more about TWRP Custom Recovery.
Step 3: Get the correct Magisk Zip
We assume that you have completed the TWRP flashing process on your Redmi 13C. We explained it to you very well in an earlier step, so make sure you do it. After completing the TWRP process, you are ready to flash Magisk ZIP files. So now you can download the latest Magisk zip file, which is given below.
Step 4: Root using Magisk Zip
- Let’s start by booting TWRP Custom Recovery.
- Press the “Install button” and find the “Magisk file”.
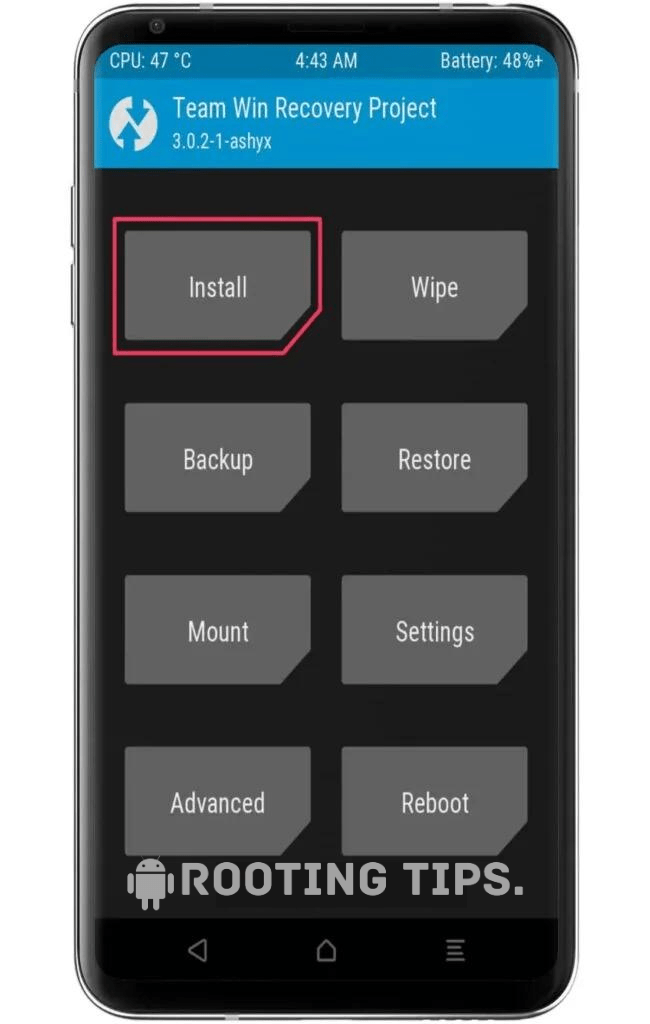
- Select the “.zip” file from the shown list to open the flashing menu.
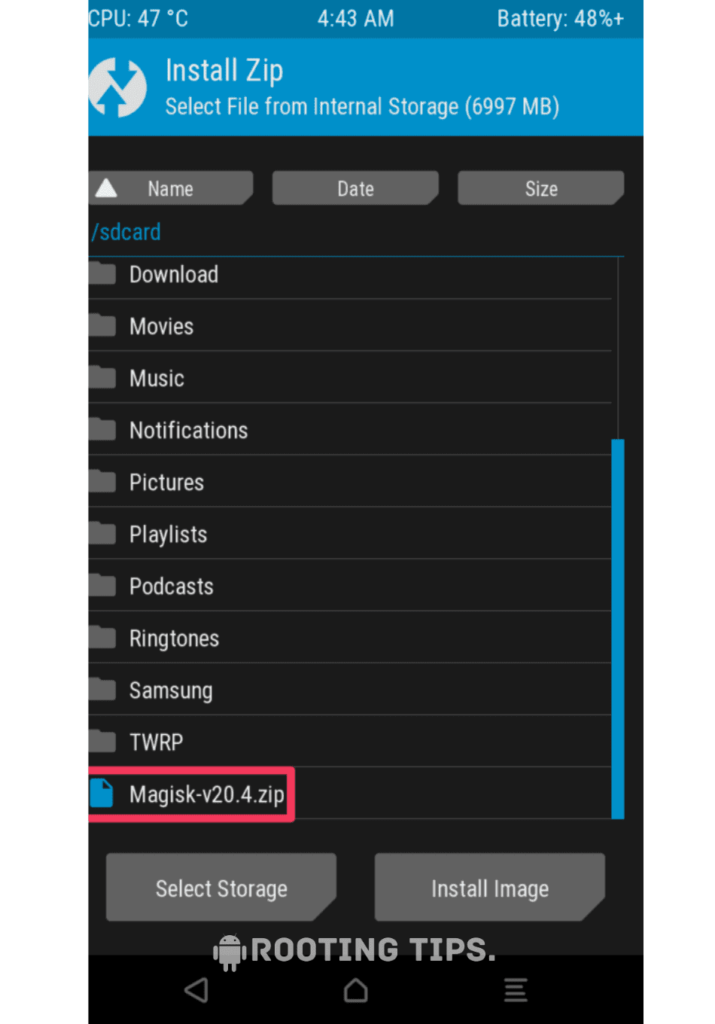
- “Swipe right” to start the flashing process.
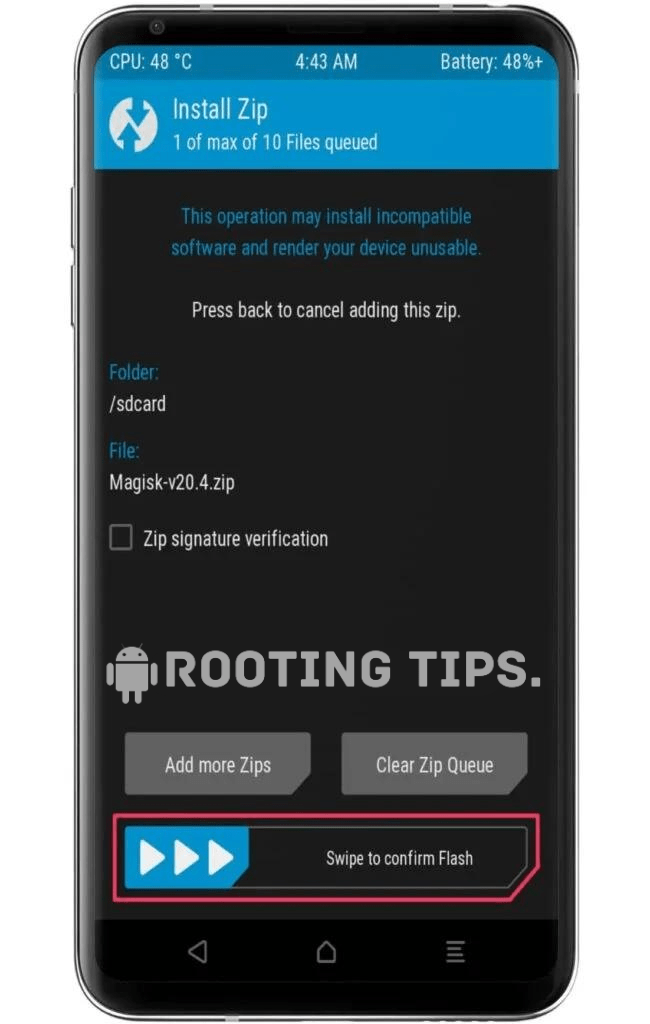
- Reboot your device when the flashing process is complete.
Amazing! Rooting your Redmi 13C has been successful. Also, you are now a “superuser.” You can modify your device to grant administrator-level access.
Frequently Asked Questions (FAQs)
Ans. KingRoot has raised concerns about its safety, as it uses different methods to gain root access and may install unwanted apps. Using more reputable alternatives like Magisk is generally considered safer, as they provide a more transparent and secure rooting process. It’s crucial to research and choose root methods carefully to avoid potential security risks.
Ans. Rooting itself doesn’t delete files, but certain rooting methods, like unlocking the bootloader, may require a factory reset, resulting in data loss. It’s essential to back up important files before rooting and follow proper procedures to minimize the risk of unintentional data deletion during the rooting process.
Ans. Magisk can be detected by some apps, particularly those using SafetyNet checks, which look for modifications to the system. Magisk provides features like MagiskHide to mitigate detection, but the effectiveness may vary, and some apps may still detect the presence of a rooted device. Users often need to employ additional measures to maintain compatibility with apps that actively seek out root access.
Conclusion
We hope that you have rooted your Redmi 13C using the methods mentioned by us. Rooting opens up a variety of advanced settings that allow you to further customize and enhance your device. If you have any questions related to rooting, then you can ask us in the comment box, and we will answer your questions. Thank you.