In today’s fast-paced digital world, smartphones have become an integral part of our daily lives. Although they provide us with a wide range of functions and functionalities, we sometimes wish to have even more control over our gadgets. Rooting is helpful in this situation. On one of the most loved Android devices, the Redmi Note 13 Pro, users have to root their device; otherwise, they cannot modify it.
This blog post will explain what rooting is, why individuals choose to root their Redmi Note 13 Pro, the benefits and drawbacks of rooting, and how to root and unroot your device step-by-step.
What is Root?
Rooting an Android device refers to the process of obtaining privileged access or control over the Android operating system, allowing users to access system files and settings that are usually restricted. By achieving “root” access, users can modify or replace the software on their devices, remove pre-installed bloatware, and even install custom ROMs or applications that require deep system-level access.
While rooting provides extensive customization opportunities and the ability to run certain apps that demand it, it also carries risks, including voiding warranties and potentially making the device more vulnerable to security threats.
Pros
- Rooting gives you complete control over your Android device.
- With root access, you can increase the performance of your Android device’s GPU and CPU.
- Rooting your device will allow you to disable or block the ads of any app.
- Install a custom Kernel, a custom ROM, and other mods on your Android device.
- You can easily Remove Bloatware from your Android device with root access.
Cons
- Rooting voids the device’s warranty.
- Rooting will prevent you from receiving official OTA updates for your Android device.
- If anything goes wrong during this, your device may get damaged or Bricked.
- After rooting, your device may experience a lagging issue.
- Rooting will not allow you to use banking apps or banking-related services like Paytm, Google Pay, Netbanking, etc. on your device.
Pre-Requirement
- Data Backup: Back up your important data on your device before rooting, Rooting has the possibility to corrupt your device’s data, so it’s important to stay safe.
- Battery charge: Your device’s battery health should be above 75% In this way, your phone’s battery will not run out during the process.
- Accurate USB Drivers and Cable: Install the accurate USB drivers for your device on your PC And pick an original USB Cable. This will help you attach your phone to the PC properly.
- Internet access: For rooting, we may need internet access. Because you will need to download an unlock tool and other stuff.
Let’s Root Redmi Note 13 Pro.
We examined a variety of approaches, before agreeing on three simple and safe solutions. Method #1 using TWRP custom recovery; and Method #2: Root your device using Fastboot and ADB. Method #3: Root Motorola G14 without a PC. But first, let’s meet the requirements before rooting. Let’s root your Motorola G14 right away.
Warning:- It’s important to be aware that rooting can void your device’s warranty and make it vulnerable, so do it at your own risk.
Method #1: Using the TWRP Custom Recovery
Success Rate:- 99%
These are some common steps to root your Redmi Note 13 Pro using Magisk:
Step 1: Unlock the bootloader
- Enable Developer Options: Go to device Settings, scroll down, tap on “About phone” and, then tap on “Build number”, and tap several times until “Developer Options” is activated.
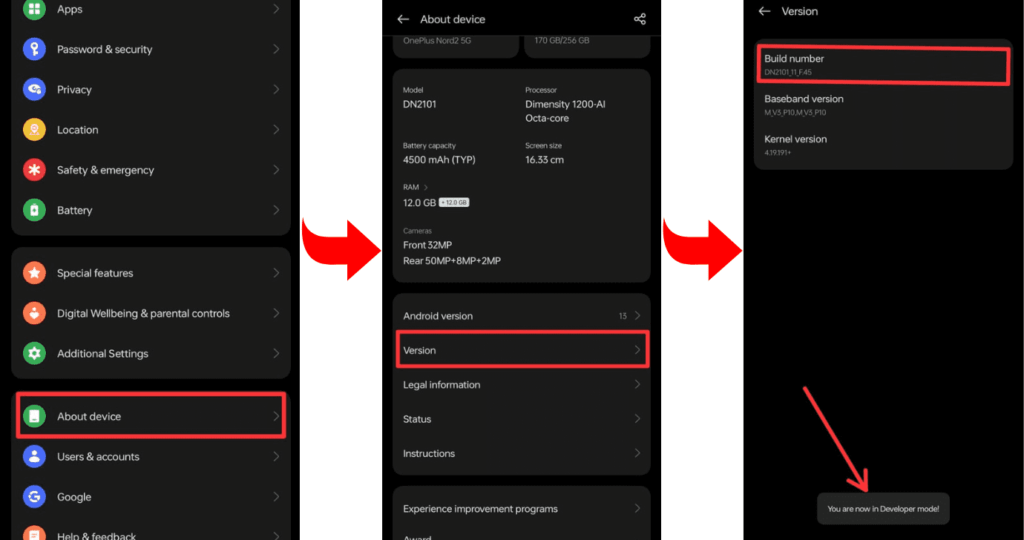
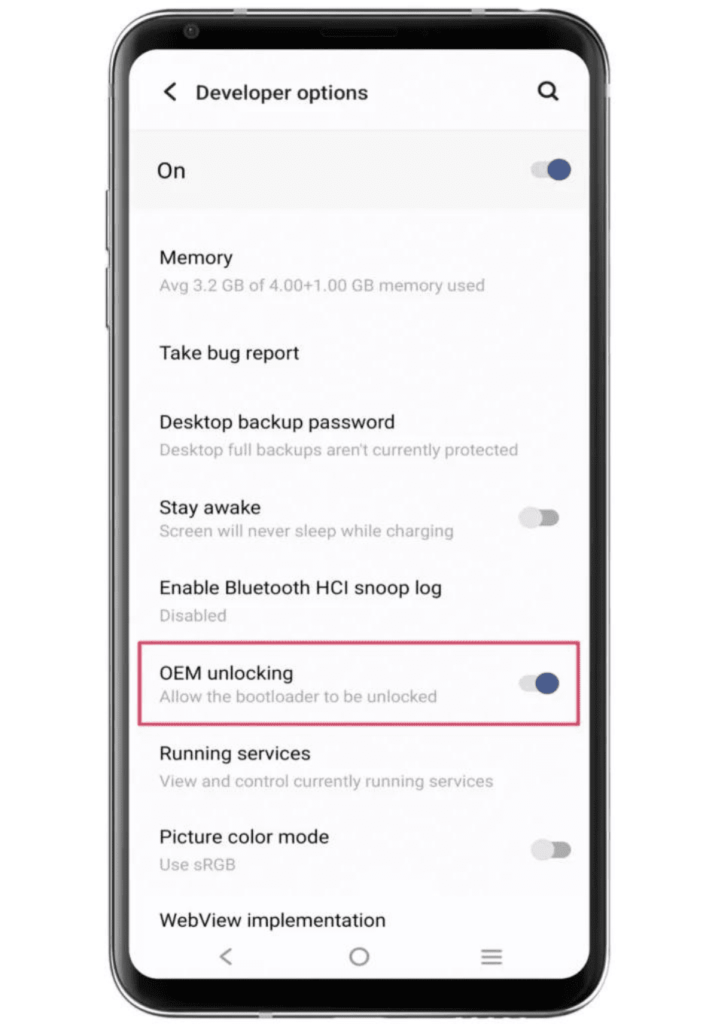
- Go to Settings and select “Developers mode”. Now find the option “OEM Unlocking” and “USB Debugging” and enable it.

- Now boot your device into bootloader mode to Unlock the Bootloader.
- Connect the phone to the PC using a USB cable.
- Type the command “fastboot oem unlock” in the terminal.
After that, the bootloader will now be unlocked on your Redmi Note 13 Pro.
Step 2: Install and flash TWRP custom recovery
- Download the file: Go to the TWRP official website and download the TWRP recovery file for your Redmi Note 13 Pro, according to the model “Note 13 Pro” and brand “Redmi” of your device. The file can be a string or in “img” format.
- Boot your phone into bootloader mode: To enter Bootloader Mode, you can press and hold the “Power button” and “Volume Down” buttons of your phone simultaneously. After that, you have to select the option “Bootloader” or “Fastboot” by using the “Volume Up/Down button”.
- Flashing TWRP Recovery: After getting your phone into Fastboot mode, use a USB cable and connect it to your PC.
- Flash the recovery: Now, open the flashing tool on your PC and select the TWRP recovery file of your phone. Select the appropriate option to flash the file and wait for the process to complete.
The recovery will be flashed successfully. After that, you can restart your phone and enter TWRP recovery to backup and restore your phone’s settings and system in text mode.
If you need a TWRP installation guide, you can check out our related posts.
Step 3: Get the correct Magisk Zip
If you have completed the TWRP recovery installation process on your Redmi Note 13 Pro, then you are ready to flash Magisk files. In this portion, you will get the most recent version, which will give you systemless root access right away.
Download the Magisk Zip by clicking the download button, and follow the instructions carefully to complete the rooting process.
Step 4: Root using Magisk Zip
I’m expecting that you have already downloaded the Magisk zip file archive. from the last section. Now we will initiate the Magisk flashing process. Here are some general instructions from the user’s direction:
- Let’s start by booting TWRP custom recovery.
- Press on the “Install button” and find the “Magisk file”.

- Select the “.Zip” file from the shown list to open the flashing menu.
- “Swipe right” to start the flashing process.
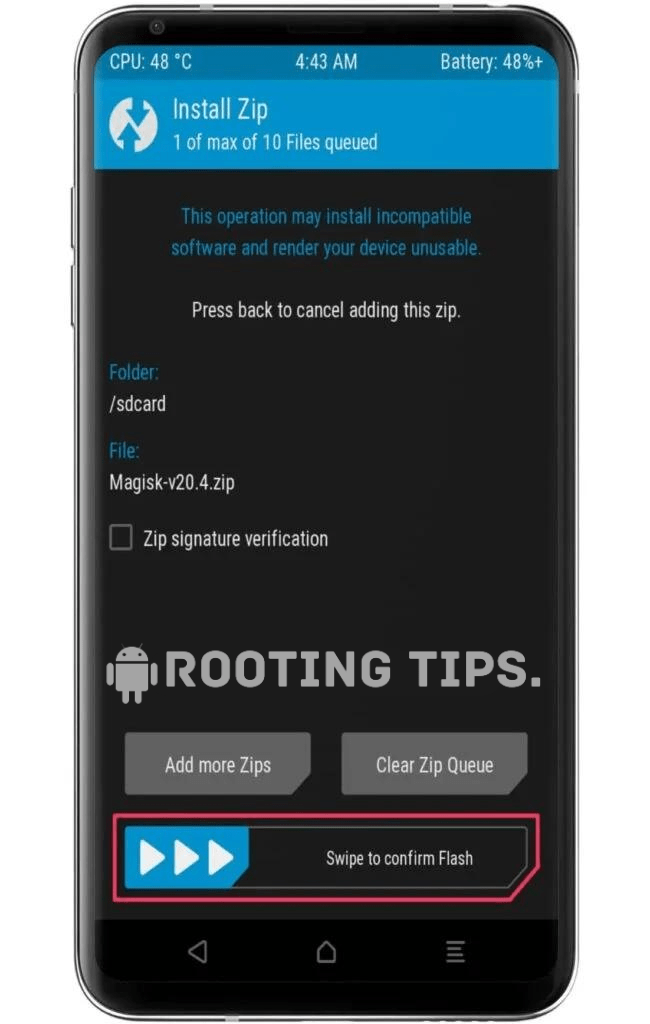
- Reboot the device when the flashing process is complete.
Now you have successfully rooted your Redmi Note 13 Pro. Enjoy the rooting and modify your device as you require.
Method #2: Root Redmi 13 Pro By SuperSU
Success Rate:- 95%
The SuperSU method is the most commonly used method for rooting. To use this method, you will need to have TWRP Recovery or any Custom Recovery installed on your device.
- Download the latest version of SuperSu Zip on your Redmi Note 13 Pro.
- First, switch off your phone and press the Volume Up and Power buttons together to boot your device into Recovery Mode.
- You will be in TWRP Recovery mode.
- Click on Install. Choose the SuperSU Zip File → Swipe to Install.
- “Flashing process is in progress”. Wait until the flashing process is finished.
- Now Reboot your device.
- Congratulation! You have Rooted your Redmi Note 13 Pro successfully.
Method #3: Root Redmi Note 13 Pro Without PC
Success Rate:- 94%
- Download and Install the KingoRoot app on your Redmi Note 13 Pro.
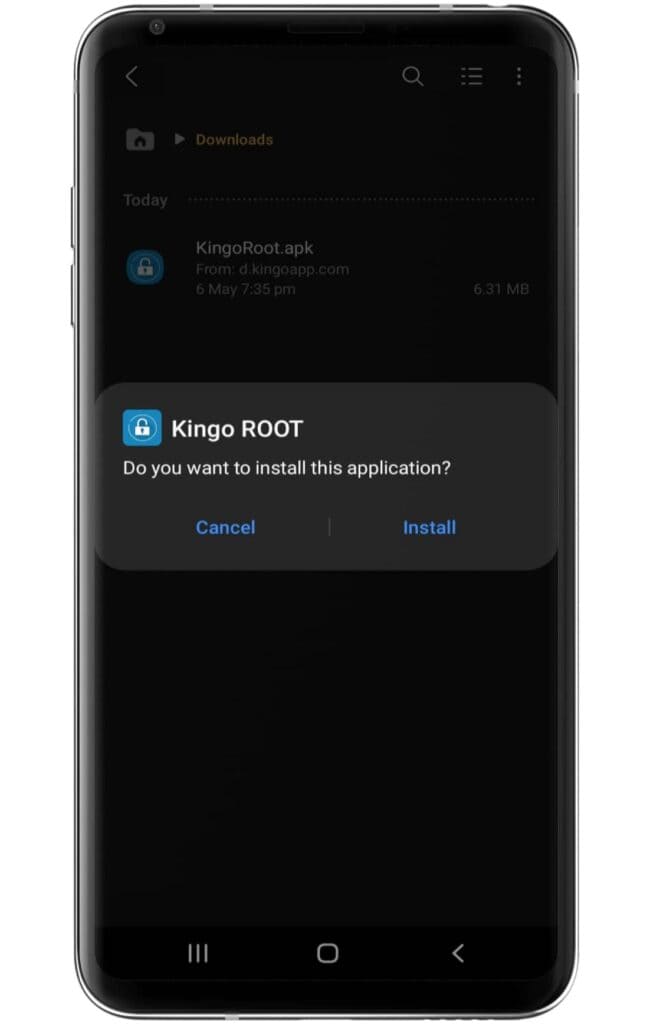
- Make sure to enable the “unknown source” settings on your device.
- Now, open the application and click on the One Click Root option.
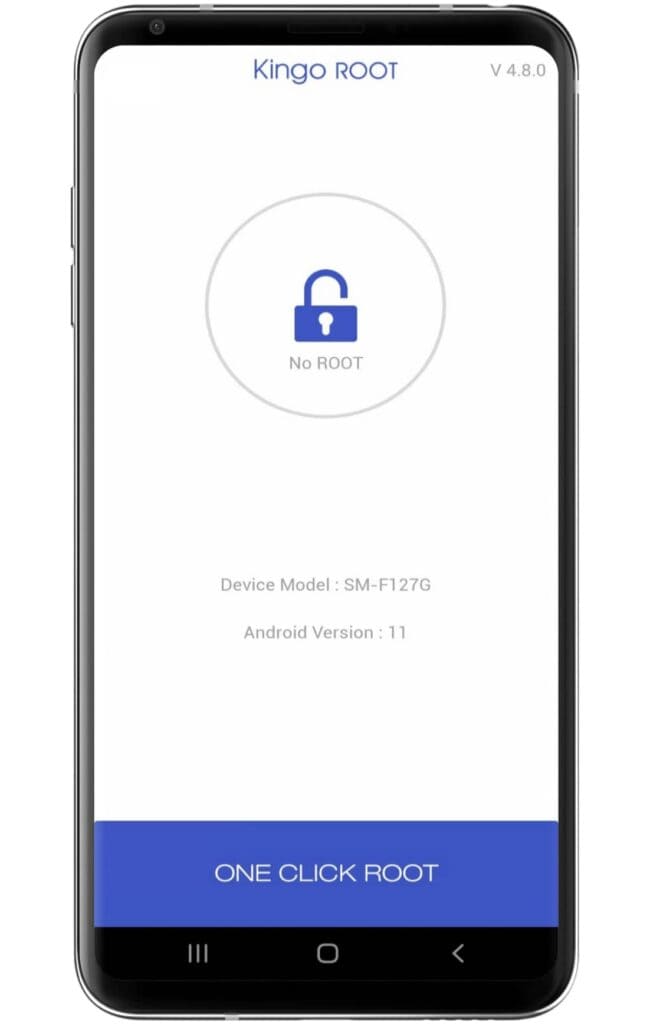
- Wait until the Rooting process ends on the Kingoroot app.
- After completing the process, You have gained root access to your device.
Awesome! Your Redmi Note 13 Pro has been successfully rooted. Now your device is ready to customize according to your requirements.
FAQs
Ans. Yes, the Redmi Note 13 Pro can be rooted. Xiaomi devices often come with locked bootloaders and security features that make rooting difficult or unsupported. Attempting to root the device may void your warranty and could lead to potential issues or bricking.
Ans. Yes, rooting your device can potentially delete data. Rooting involves gaining privileged access to the device’s operating system, which can lead to unintended consequences if not done correctly. It may cause data loss or even result in a complete wipe of the device during the rooting process.
Ans. Yes, rooting your Redmi Note 13 Pro can be risky. Rooting involves gaining administrative access to the device’s system, which can potentially lead to security vulnerabilities, void warranty, and cause software instability if not done properly.
Ans. Yes, you can unroot a rooted Redmi Note 13 Pro. By using appropriate methods, such as flashing the official firmware or using unrooting apps, you can reverse the rooting process and restore your device to its original state.
Conclusion
In this article, we have discussed 3 ways to root your Redmi Note 13 Pro. Kingoroot is the easiest of all these methods. If you don’t know much about rooting then we recommend you use the Kingoroot method.
If you are an experienced user then you can use any of the rooting methods given in this article. We hope that we have explained the rooting methods given in this article correctly and it has been helpful to you.
Nice ????