If you have come here to know how to root Tecno Spark Go, then you are in the right place. Today we will tell you about the easiest ways to root in this article. Before rooting, it is also very important to weigh the advantages and disadvantages of your rooting. Let us discuss these first.
What is Root?
It’s like unlocking all the potential of an Android device after you root it. Having access to and the ability to alter the most profound levels of the operating system is like having the keys to the kingdom. Consider it Android’s equivalent of being a superhero, giving you the ability to change, adjust, and optimize your device beyond what is typically possible.
Advantages or Benefits of rooting
- Use of special applications: Rooting allows you to use some special applications that only work on rooted devices and can give you more control.
- Superpower: When you root your device, you get full control over it, allowing you to make customizations to it and remove unwanted applications.
- Improved Battery Life: Rooting allows you to install some battery-saving applications and optimize the system, thereby improving battery life.
- Custom ROMs: After rooting, you can install custom ROMs on your device that come with new features and better security.
- Full control of applications: Rooting allows you to access and remove system applications, which can improve your device’s performance and display efficiency.
Disadvantages or Cons of Rooting
- Warranty may be void: When you root your device, it may void your warranty. The company usually does not support rooting, and it may deprive you of access to services.
- Security Threat: Rooting can threaten the security of the device, as it can deprive you of new security settings and make you the target of more malware.
- Software Update Issues: When you root your device, there may be a problem with providing software updates, causing you to miss out on new security and enhancement features.
- Bricking Risk: If something goes wrong during the rooting attempt, your device may get “bricked,” causing permanent damage to it and making it difficult for you to get it back up and running.
- Battery life may be affected: After rooting, you may run translator applications and processes that may consume more battery, which may affect battery life.
Pre Requirements:
- Battery charge: your device’s battery should have more than 80% Otherwise, your device will drain out while rooting.
- Data Backup: Before rooting, make sure to put your device’s data in a safe place because root has the potential to corrupt your device’s data.
- Internet access: Make sure you have internet access while rooting. because you will need to know some unlocking tools and download some files.
- Device version check: Before rooting, check your device model number and version, because you need to learn the correct rooting method and download some files for your device.
- Correct USB Drivers and Cable: Install the correct USB drivers for your device on your PC and choose an original USB cable. This will help you connect your phone to the PC properly.
Let’s Root Tecno Spark Go
We experimented with several methods before determining two safe and easy ways to root your device. Before starting, though, confirm that you fulfill all requirements for a secure rooting procedure. Method 1: Without a computer, root your Tecno Spark Go The second approach is the TWRP Custom Recovery.
Warning:- Despite rooting, keep in mind that it may make you lose your guard and cause security issues. Root carefully and correctly.
Method #1: Root Tecno Spark Go Without PC
- Download and install the KingoRoot app on your Tecno Spark Go.
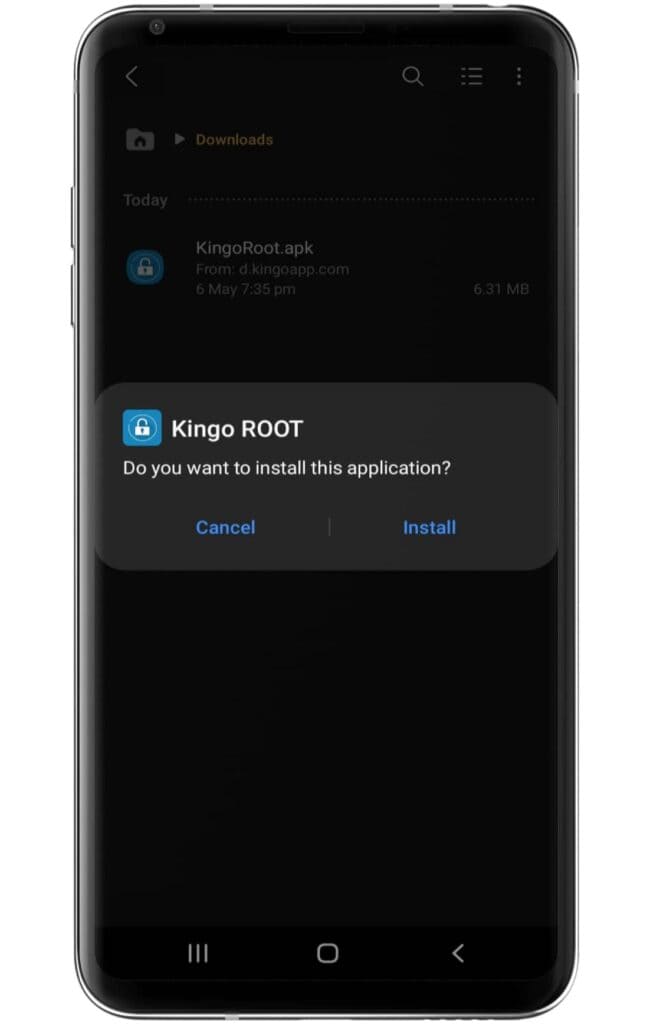
- Make sure to enable the “unknown source” settings on your device.
- Now, open the application and click on the One-Click Root option.
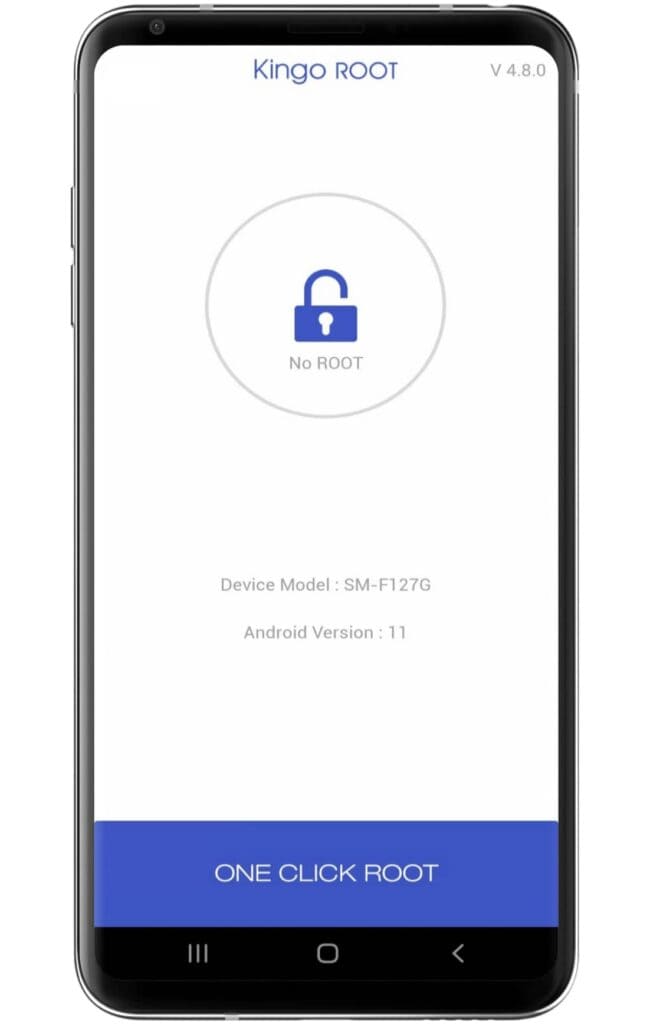
- Wait until the rooting process ends on the Kingoroot app.
- After completing the process, your Tecno Spark Go has been successfully rooted.
Method #2: Using the TWRP Custom Recovery
Step 1: Unlock the bootloader
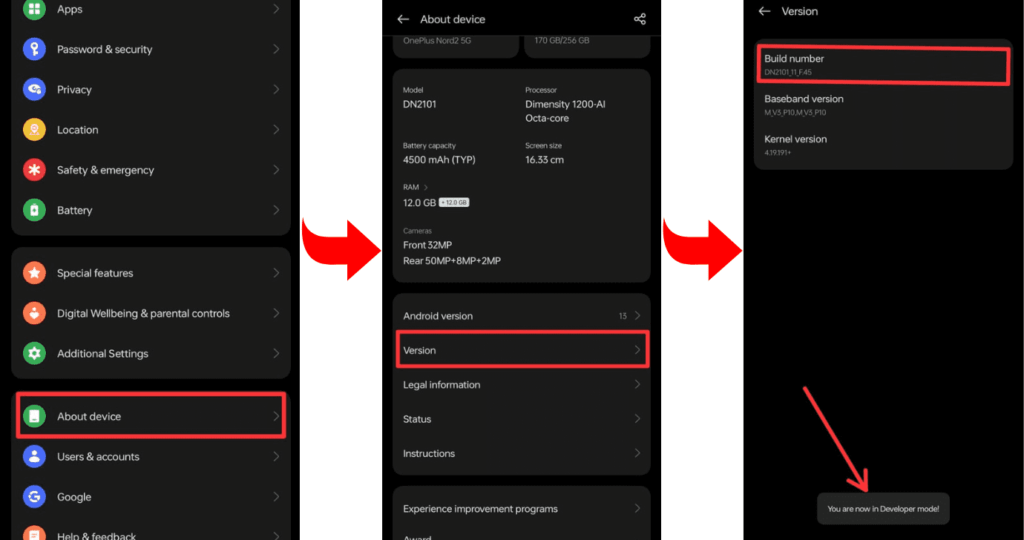
- Enable Developer Options: Go to device settings, scroll down, and tap on “About phone” then tap on “Build number”, several times until “Developer Options” is activated.
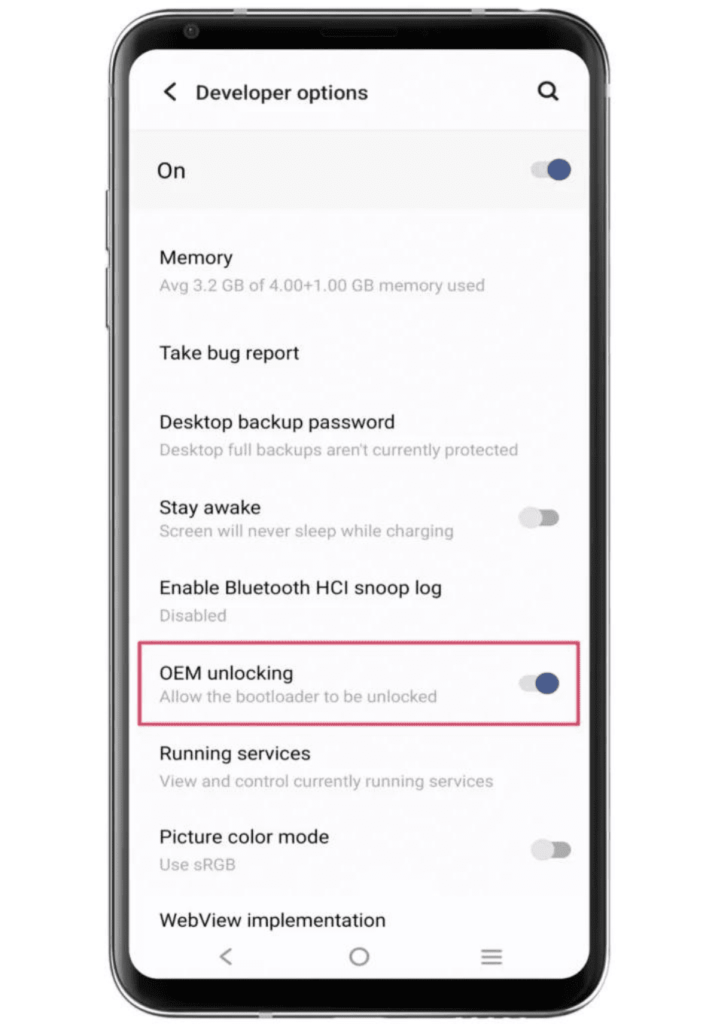
- Go to Settings and select “Developers Mode.” Now find the options “OEM Unlocking” and “USB Debugging” and enable them.

- Now boot your Root Tecno Spark Go into bootloader mode to unlock the bootloader.
- Connect the phone to the PC or laptop using a USB cable.
- Type the command “fastboot oem unlock” in the terminal.
Step 2: Install and flash TWRP custom Recovery
- Download the file: Go to the TWRP official website and download the TWRP recovery file for your Tecno Spark Go, according to your device’s model “Spark Go” and brand “Tecno.” The file can be a string or in “img” format.
- Boot your phone into bootloader mode: To enter bootloader mode, you can simultaneously press and hold your phone’s “Power button” and “Volume Down” buttons. After that, you have to select “Bootloader” or “Fastboot” by using the “Volume Up/Down button”.
- Flashing TWRP Recovery: After getting your phone into Fastboot mode, use a USB cable and connect it to your PC.
- Flash the recovery: Now, open the flashing tool on your PC and select the TWRP recovery file on your phone. Select the appropriate option to flash the file, and wait for the process to complete.
If you need a TWRP installation guide, check out our related posts; you may know more about TWRP Custom Recovery.
Step 3: Get the correct Magisk Zip
We hope that you guys have completed the TWRP process, so we are assuming that you have completed the TWRP flashing process on your Tecno Spark Go. Which we told you very well in earlier steps. After that, you are ready to flash the Magisk zip file. So now download the latest Magisk zip files, given below.
Step 4: Root using Magisk Zip
- Let’s start by booting TWRP Custom Recovery.
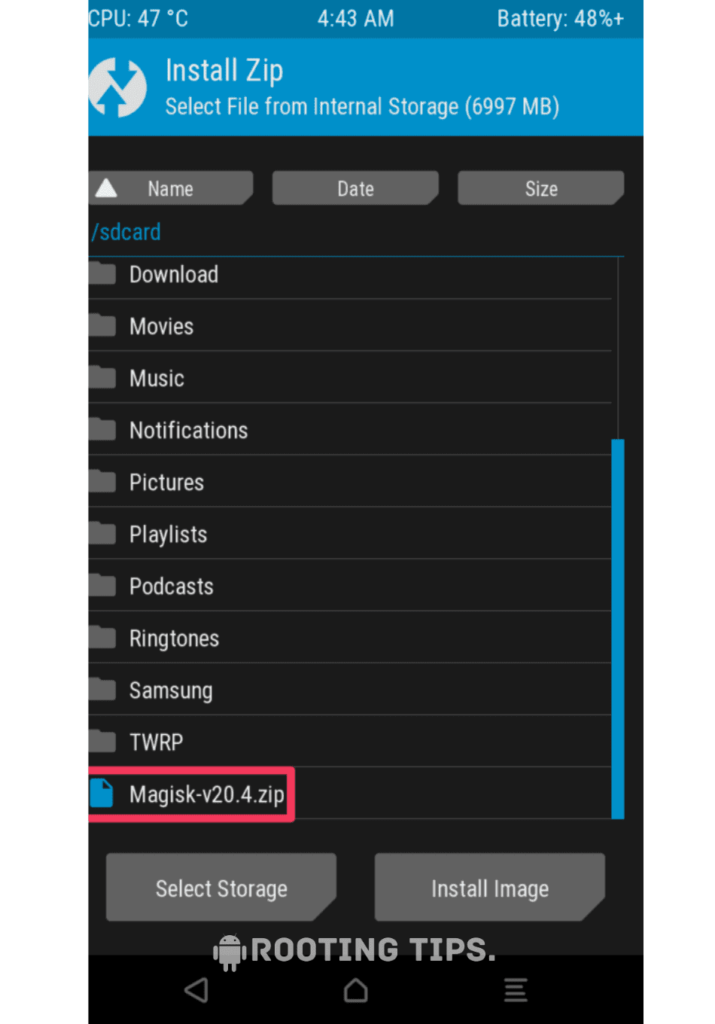
- Press the “Install button” and find the “Magisk file”.

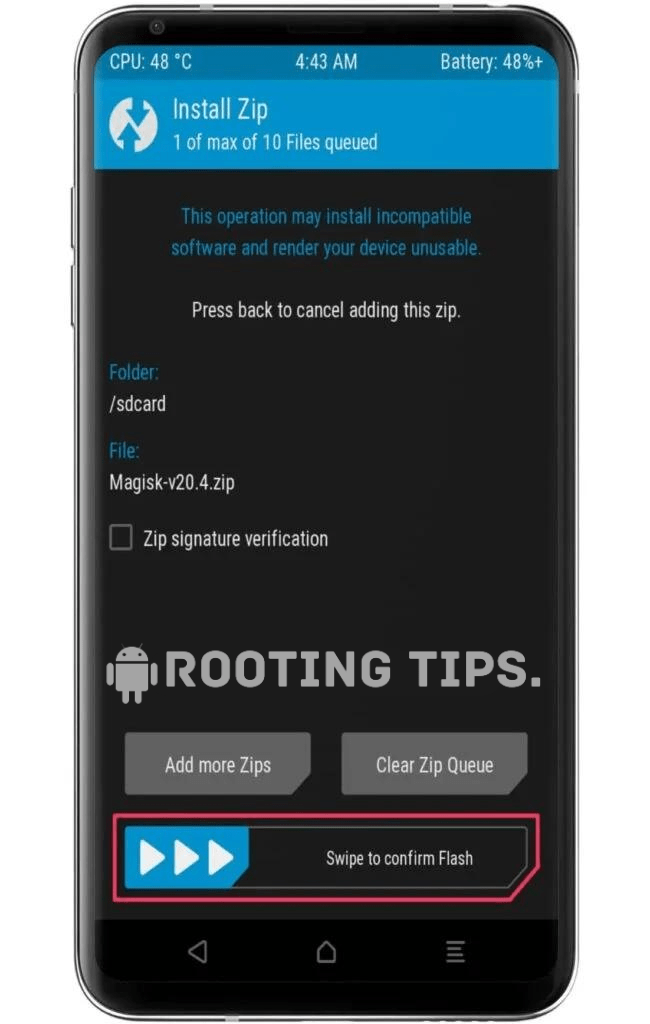
- Select the “.zip” file from the shown list to open the flashing menu.
- “Swipe right” to start the flashing process.
- Reboot your device when the flashing process is complete.
Excellent! Your Tecno Spark Go has been successfully rooted. All of your device’s root-related services are now available for use.
Frequently Asked Questions (FAQs)
Ans. Magisk root is considered relatively safe as it allows systemless rooting, reducing the risk of detection and maintaining device integrity. However, users should exercise caution, follow proper procedures, and be aware of potential security implications when using any rooting tool like Magisk.
Ans. Yes, you can unroot your phone by using unrooting methods provided by root management apps or by flashing the stock firmware. Unrooting restores the device to its original state, often reestablishing warranty eligibility.
Ans. Rooting alone may not directly improve performance, but it enables customization and optimization options like custom ROMs and tweaks that can enhance overall device speed and responsiveness. Careful consideration and proper implementation are crucial to achieving performance improvements through rooting.
Conclusion
We hope that you have understood the methods we have talked about and that you have successfully rooted your Tecno Spark Go without any problems. And please forgive us if you faced any problems while rooting. And you can tell us your problem by commenting. We will try to find a solution. Thank you.